Manage Accounts
- Navigate
- Click on the content list below
to skip ahead to the different sections
on this page -
Client's Account Management
-
Overview
-
Client Details
-
Financial
-
Loans and Products
-
Funding
-
Attachments
-
Related Parties
-
Notes
-
Client Documents
-
Account Options
-
Assess Serviceability
-
Compare Products
-
Compare Loan Splits
-
Calculate Income
-
Run Credit Report
-
Send Client Form
-
Send Email / SMS
-
Add Activity
-
Add File Note
Client's Account Management
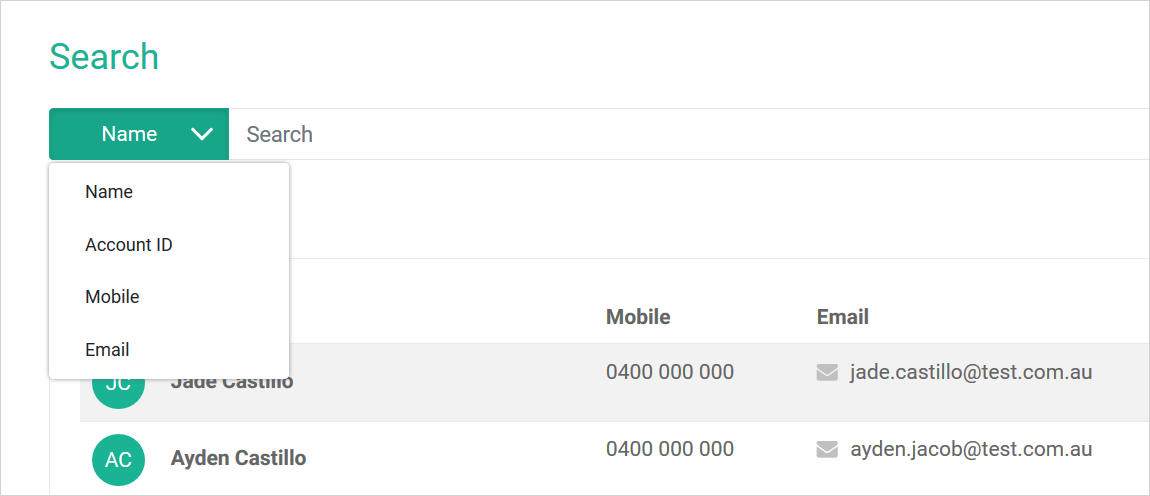
This screen allows you to locate your existing Leads or Client's using the search function with either the client's:
- Name
- Account ID
- Mobile
- Or Email
In addition to this, you can separate the search into Clients or Leads:

In addition to this, you can sort the data by created date or alphabetically:

On the manage account page, You can search for your client by client id number, name, mobile number, and email. Also you will see the full list of your client's and leads.
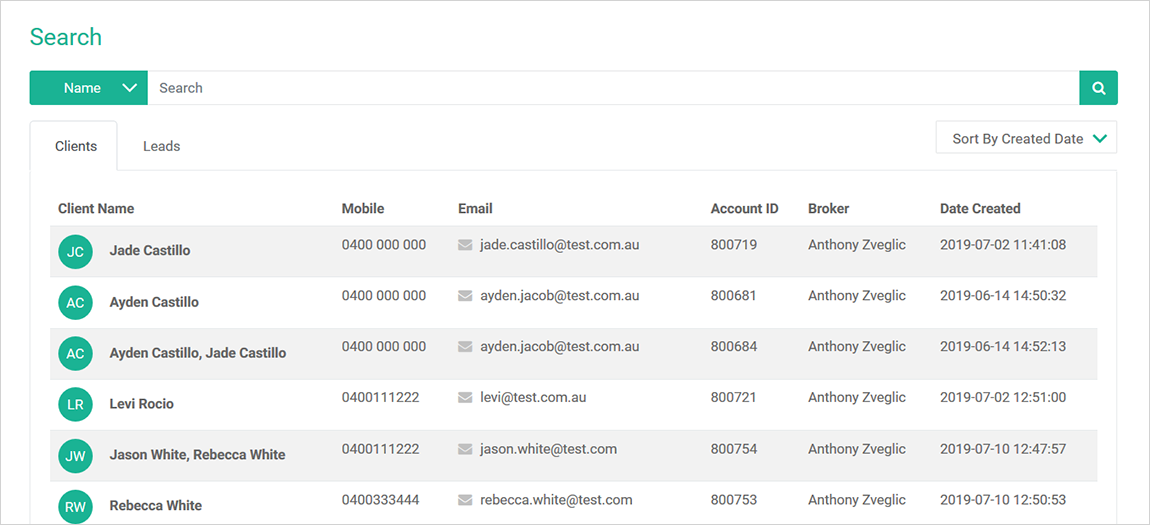
At this point you need to select the appropriate client/s file that you want to work with. When you have selected the client/s the following information will relate to them.
Overview
When you click into a specific client’s profile, you will see an overview of that client.
If you click
into
a specific client’s profile that has other applicants attached to the entity then you will see an overview
for all entities that are connected or associated.
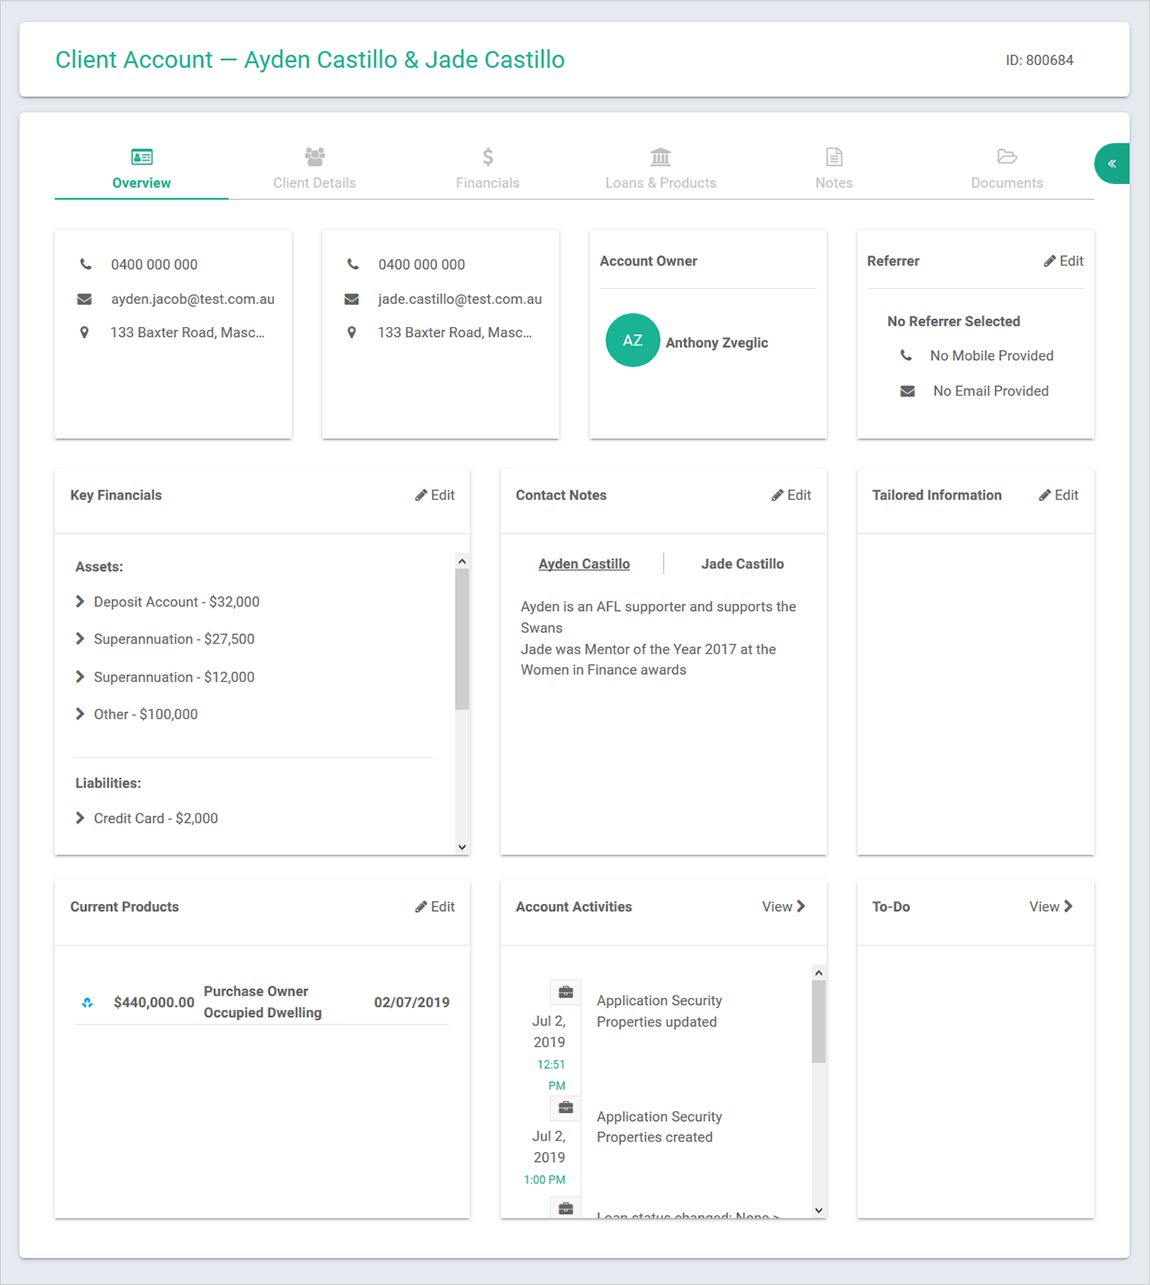
With the 'Overview'; you will see a complete summary of your client's profile which includes:
- Client's contact:
- Phone number
- Email address
- Residential address
- Account owner:
- Credit Representatives details
- Referrer:
- Name
- Phone number
- Email address
- Key Financials:
- Client assets
- Client liabilities
- Contact Notes:
- Any information you think is relevant to you help build rapport or to engage with your
clients.
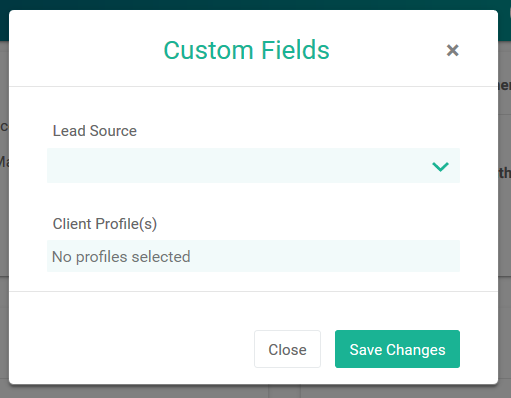
Could include sporting teams supported and employment related information as an example. Children’s names and DOB is also popular. - Tailored information:
- Lead Source: Create your lead sources in the customisation section of Infynity
- Client Profiles: Create your client profiles in the customisation section of Infynity
- See image below as a reference:
- Current Products:
- Existing facilities you have allocated to the client
- Account Activities
- A summary of your File Notes and progress of Account activity
- TO-DO
- A list of action items that you have created to remind your self to complete for the client
Client Details
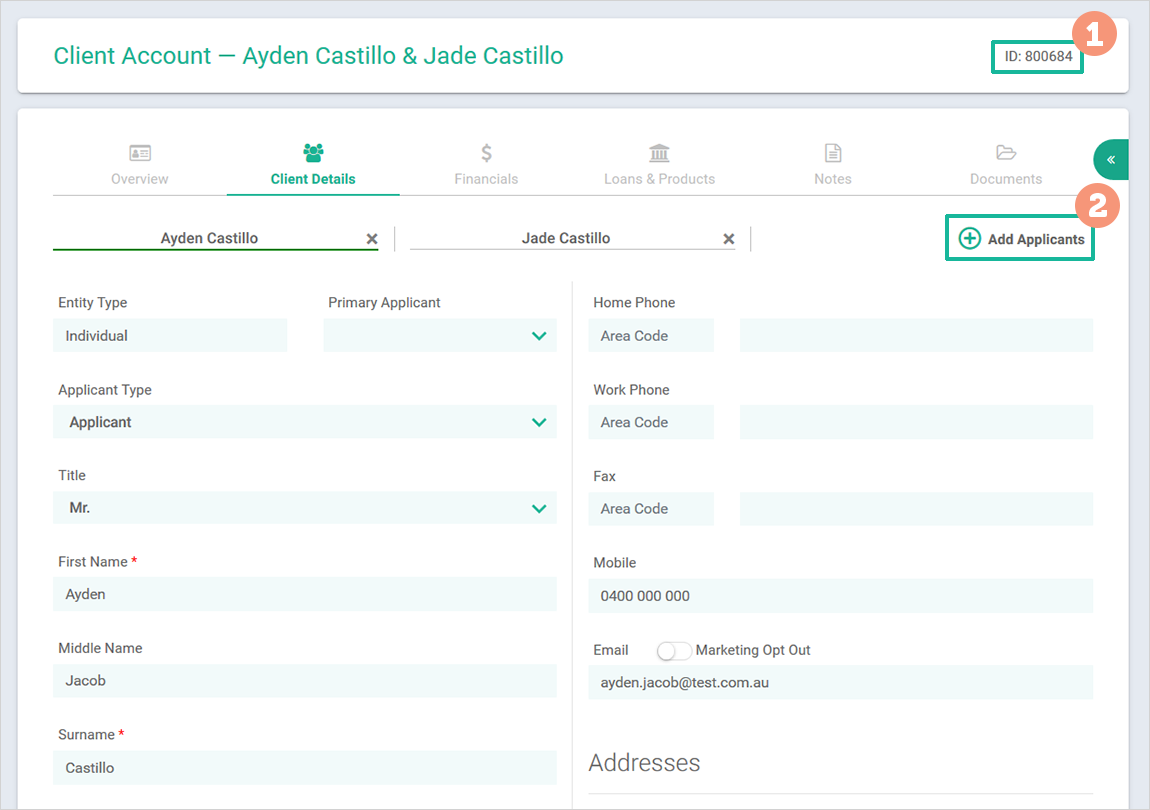
When you click 'Client Details' tab, you can add or edit the client's profile information including name,
address, date of birth, contact information etc.
The client identification number is displayed here [1]
and
you can also add another applicant to the profile [2] under the selected client's account here as shown
below:
Remember to add or update information on each client profile and always press save on each screen to validate and store the information:


Financials
On this tab you will see the client's financial status. You can add or edit the clients:
- Assets
- Liabilities
- Income sources
- Expenses
Simply click the 'Add' button on the top far right of each section as shown in the image below:

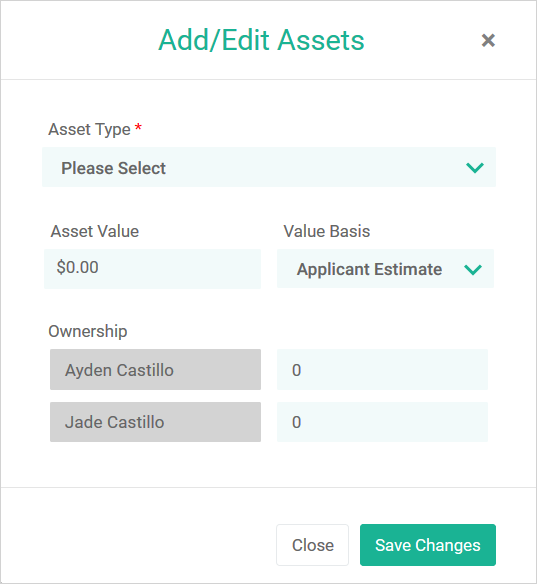
For example, if you want to add your client's asset position; click the 'Add Assets' button:
- select the asset type from the dropdown list
- enter the Asset Value
- specify the Value Basis as either:
- Applicant Estimate
- Certified Valuation
- Ownership: define what percentage is owned by each client
- and finally click 'Save Changes'.
The remaining options of add Liability; Income; Expenses are available for you to complete each required field and press ‘Save Changes’ to add the item to your clients profile.
Loans and Products
In this section you can Add or Edit the finance application that the client is applying for (the new lending facility, or edit the existing facility you have entered). Currently there are options for:
- Mortgage Finance
- Asset Finance (including Personal Loans)
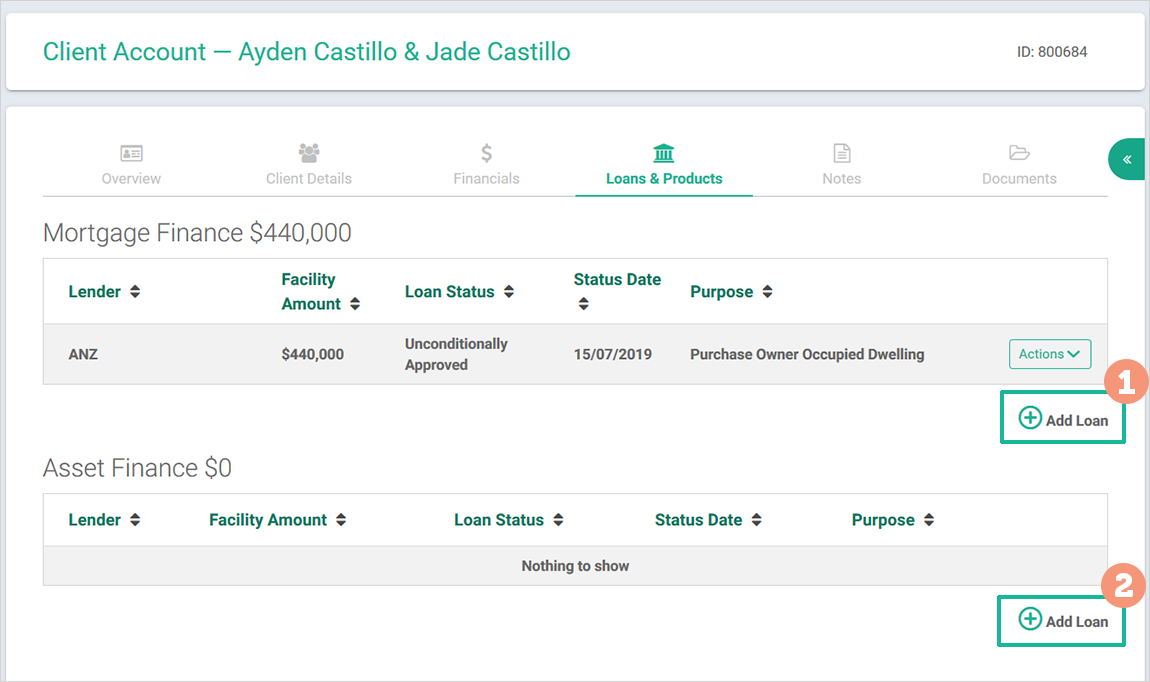
When you click Add Loan, a new separate page will open with the following areas for you to complete:
Loan Facility:
- Lender: from the drop-down menu select the required Lender
- Facility Amount: the exact amount of finance being applied for, if the Lender loan approved amount
is different (after you receive your formal approval)
– you must adjust the loan amount here so that it is exact and record a file note detailing this.
This is to assist with timely RCTI upfront and trail payments from the Lender to you - Purpose: from the drop-down menu select the applicable purpose
- Select the Applicant/s applicable to the transaction, slide the toggle selector
- Loan Status: press edit to activate your options and select the applicable loan status
- Estimated settlement date: enter the estimated settlement date here
- Loan Products
- Loan Summary Notes: this is where you highlight any relevant information that does not fit into any
other category ie,
90% lending with waiver of LMI for a client that works in an approved medical profession - First Home Buyer: select Yes or No
- Low Doc: select Yes or No
- Commercial: select Yes or No
- Lease: select Yes or No
- Pre Approval Expiry Date: enter the date the application pre approval expires ie, 90 days
- Brokerage: enter the amount (if applicable) that you are charging the client for your services – separate to your Lender upfront and trail
- Override LMI: select Yes or No
- Override LMI Amount: enter the amount of LMI applicable to the transaction
- Cap LMI: enter the dollar amount that the LMI is capped at
- Max LVR for Cap LMI: enter the LVR percentage that the LMI is capped at
- Referrer: Add your Referrers in the customisation section of Infynity, then select the applicable one for this transaction
- Always press Save Changes on every page!

At any stage you can return to the client Loan Summary page by pressing 'Return to Loan Summary' as shown:

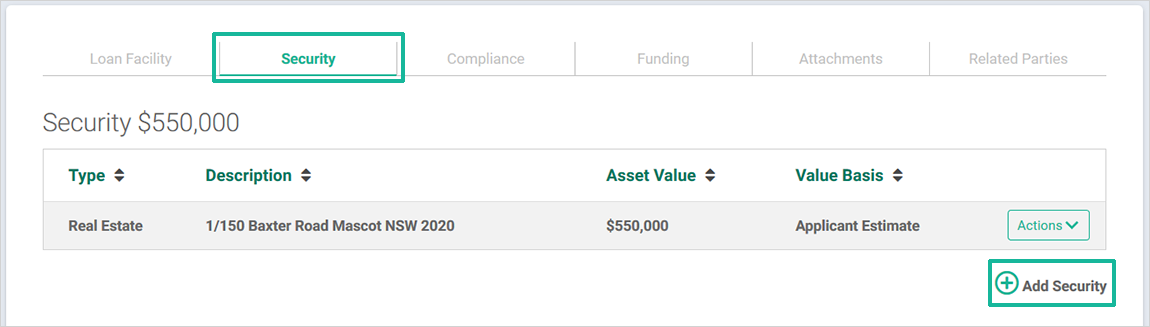
Security:
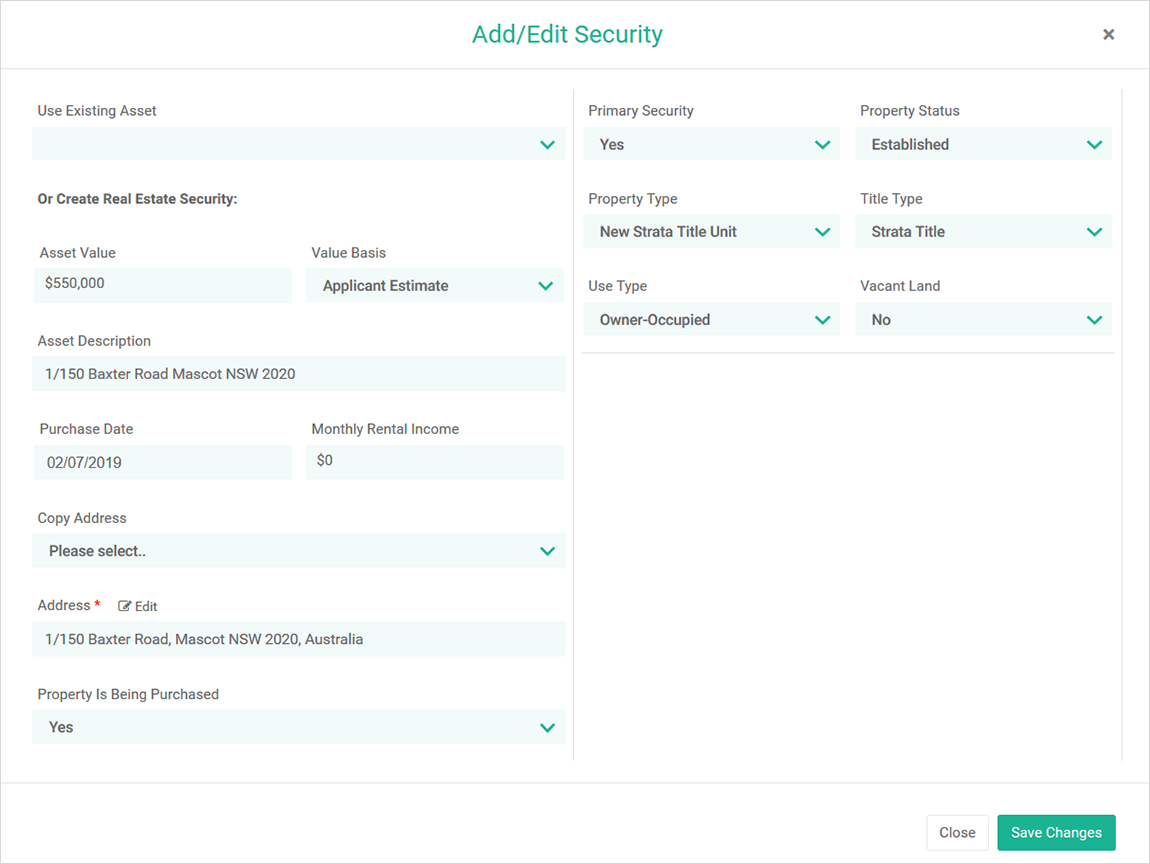
When you click Add Security, a new separate page will open with the following areas for you to complete:
- Use Existing Asset: if you have entered the security as an asset it will be an option here in the drop-down menu
- Asset Value: enter the amount the client advises
- Value Basis: from the drop-down menu enter either Applicant Estimate or Certified Valuation
- Asset Description: enter the address details here
- Purchase date: enter this if applicable
- Monthly rental income: enter this if applicable
- Copy Address: from the drop-down menu – select a previously entered address
- Address: press edit to activate the pop-up screen to enter the address in the format required
- Property Is Being Purchased: select Yes or No
- Primary Security: select Yes or No
- Property Status: select the applicable option from these selections:
- Established
- New Building
- To Be Built
- Vacant Land
- Property Type: select the option from the eleven selections available (refer to the purchase contract or the client information for assistance if required)
- Title Type: select the option from the six selections available (refer to the purchase contract or the client information for assistance if required)
- Use Type: from the drop-down menu enter either Owner-Occupied or Investment
- Vacant Land: select Yes or No
Compliance
ASIC takes Compliance very seriously as does Finsure. You must Edit and Create each of the following
Credit
Compliance Forms:
- Preliminary Assessment Summary
- Preliminary Checklist Report
- Credit Proposal
- Credit Quote
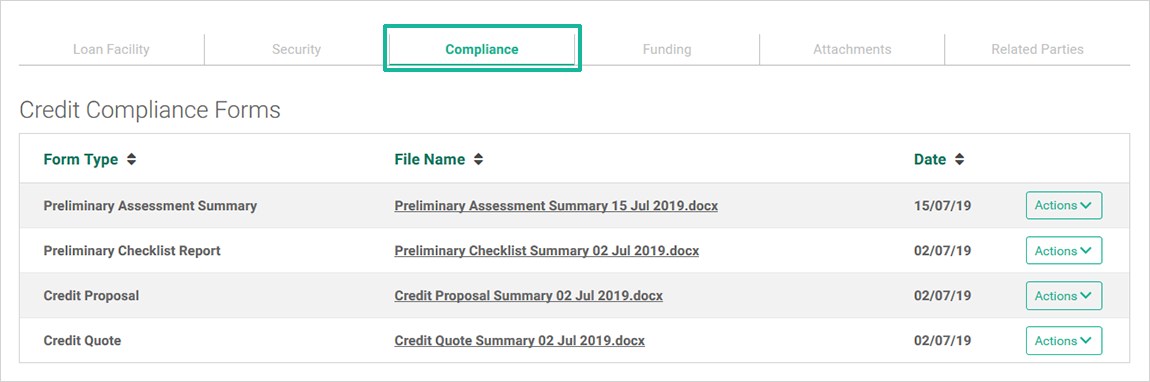
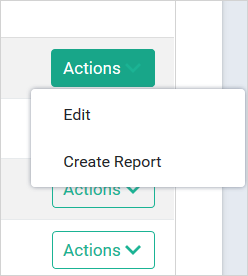
You will have two options to select from, always select Edit initially:
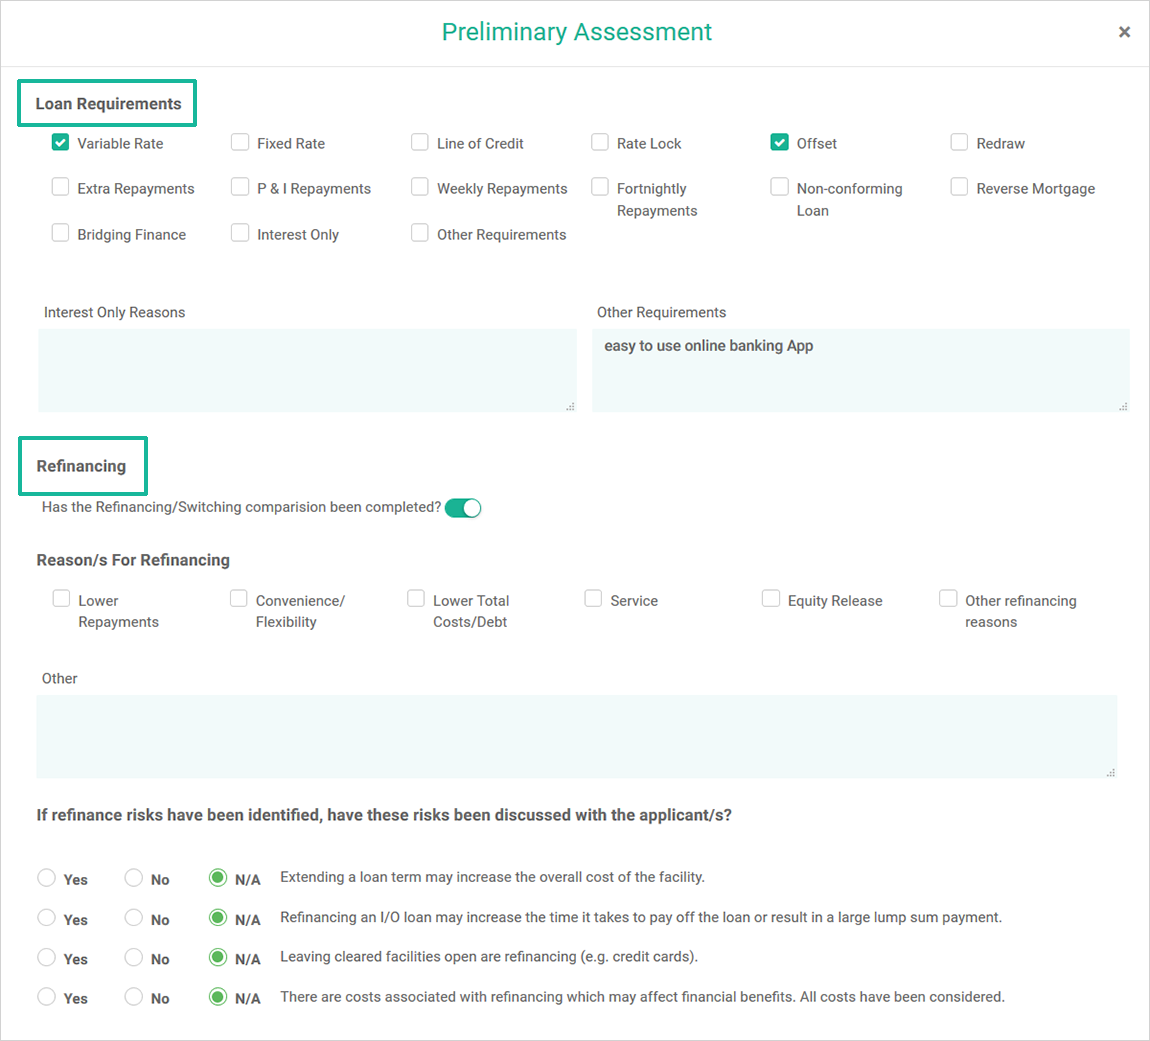
A new pop-up screen will be available to complete the following information:
- Loan Requirements: select all of the available options that are applicable to the transaction and your client
- Interest Only Reasons: specify why your client is seeking an Interest Only facility ie, under advice from their Accountant
- Other Requirements: any thing else the client specified on why they selected a particular Lender and Loan Product
- Refinancing: if the client is Refinancing an existing loan, the toggle must be activated, and the
Reasons for Refinancing specified.
There are six options available in addition to a free text field for comments - If refinance risks have been identified, have these four specific risks been discussed with the applicant/s. Select Yes, No or N/A:
- Extending a loan term may increase the overall cost of the facility
- Refinancing an I/O loan may increase the time it takes to pay off the loan or result in a large lump sum payment
- Leaving cleared facilities open are refinancing (e.g. credit cards)
- There are costs associated with refinancing which may affect financial benefits. All costs have been considered
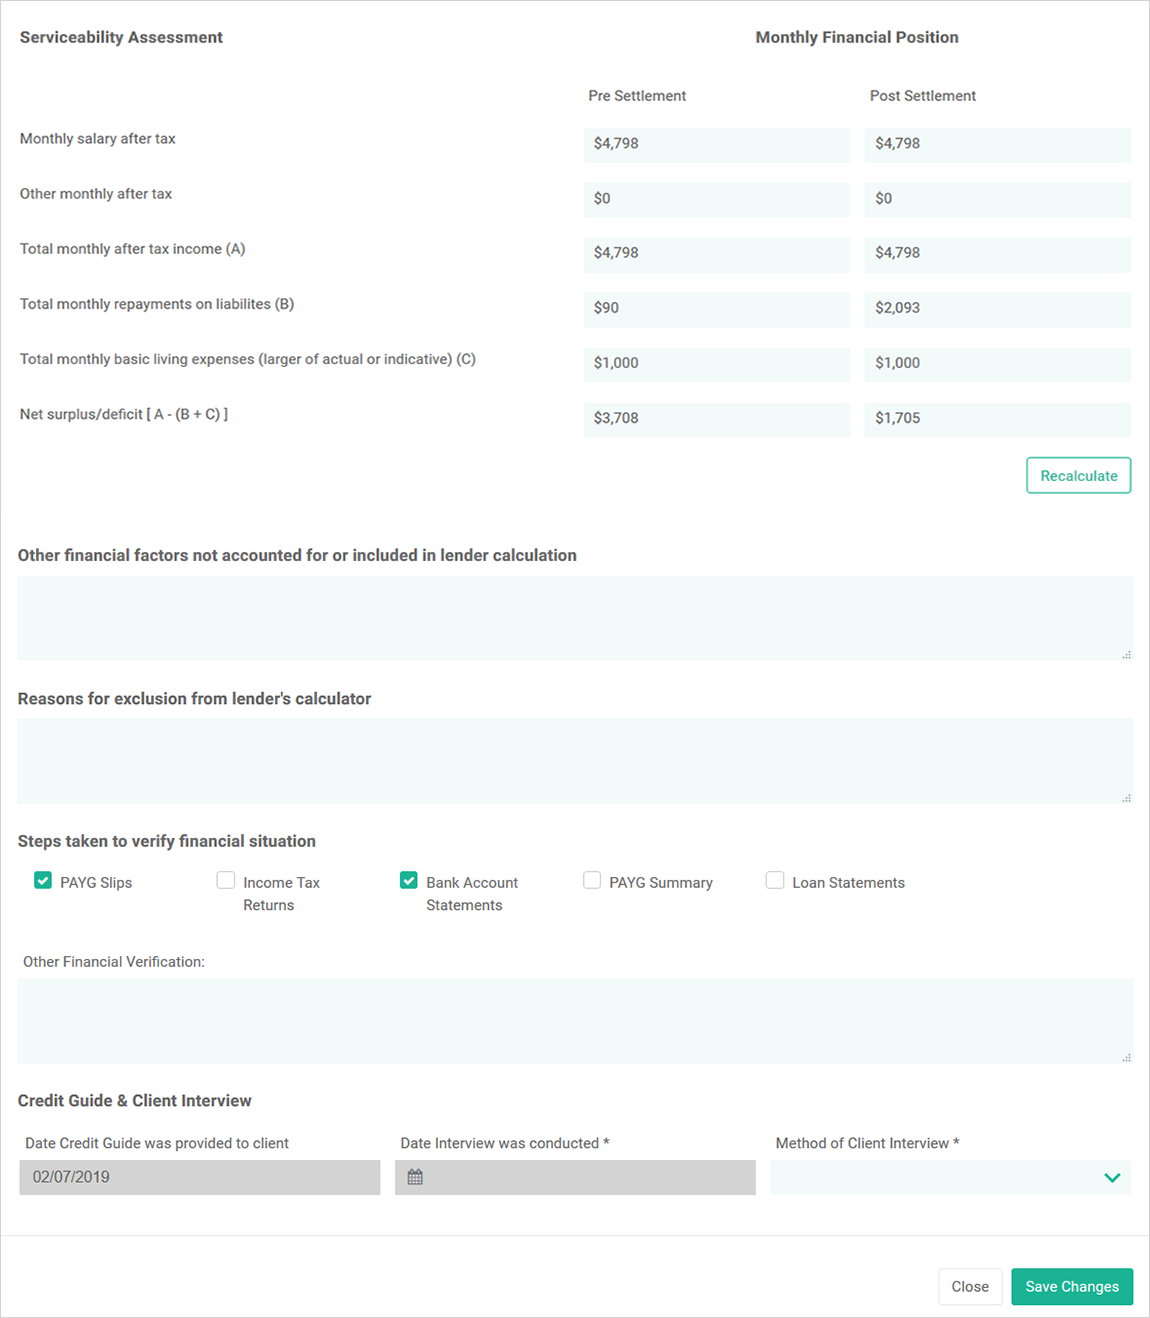
Continuing in the pop-up screen, the following requires completion:
- Client Living Expenses: complete the monthly expenses in each of the 13 categories and the total
- Serviceability Assessment: complete the monthly Pre and Post Settlement figures Other financial factors not accounted for or included in lender calculation:
- any information such as evidenced cancelation gym or Foxtel memberships can be specified here
- Reasons for exclusion from lender's calculator: please specify details in this section
- Steps taken to verify financial situation: what evidence have you collected from the following list to support the clients loan application:
- PAYG Slips: are they current as per lender requirements
- Income Tax Returns: are they current as per lender requirements
- Bank Account Statements: are they current as per lender requirements
- PAYG Summary: are they current as per lender requirements
- Loan Statements: are they current as per lender requirements
- Other Financial Verification: what other steps have you taken to veryify the clients information, for example:
- Did you research the employer online
- Did you call the employer and verify the client works there
- Credit Guide and Client Interview: please specify the following:
- Date Credit Guide was provided to client
- Date Interview was conducted
- Method of Client Interview, your options are:
- Face to Face
- Video
- Telephone
- Always press 'Save Changes'
After you have completed the report, use the Actions tab to 'Create Report' as shown:
The Preliminary Assessment Summary will download for you in a rich text Word
document,
make any adjustments and covert to a PDF before emailing to your client or printing and handing it to them.
Note, if you need to access the documents at a later time, you can click on the hyperlink where the most
recent version is saved as shown:
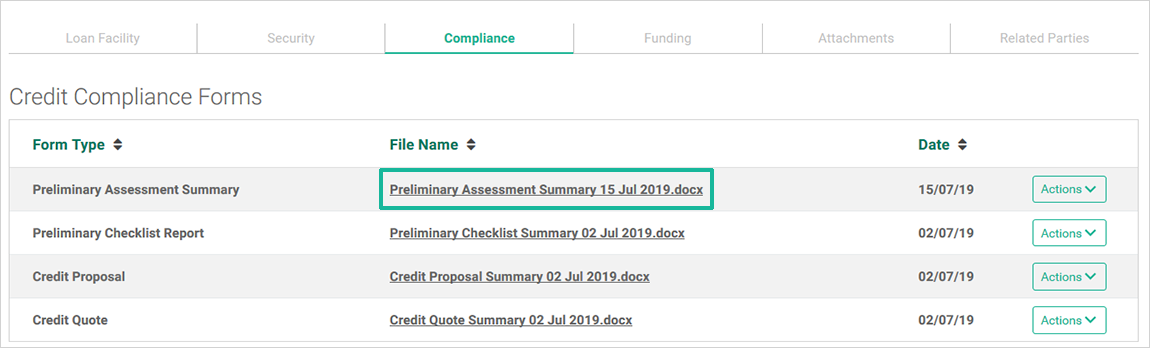
Follow the same process to complete the remaining mandatory Compliance
documentation:
- Preliminary Checklist Report
- Credit Proposal
- Credit Quote
Funding
This tab requires you to complete the following Loan Information:
- Loan amount
- Loan Purpose, your options are:
- Purchase
- Construction
- House and Land
- Refinance
- Equity
- Increase
- Personal Loan
- First Homeowners Grant/Bonus – applicable to each State,
if in doubt have the client refer to their solicitor for eligibility - Cash Deposit – if applicable
- Gifts – if applicable(non repayable otherwise it is considered a loan)
- Clients funds – if applicable
- Client Costs
- Bank Fees – refer to the Product Comparison for this information or the specific Lender loan information page for every Lender and every loan
- Pest and Building Fees – if applicable
- Outgoings – if applicable (ie, utilities services, strata rates, council rates due)
- Legal Fees – if applicable
- Removalist Costs – if applicable
- Other Costs – if applicable

At any stage you can return to the client Loan Summary page by pressing 'Return to Loan Summary' as shown:

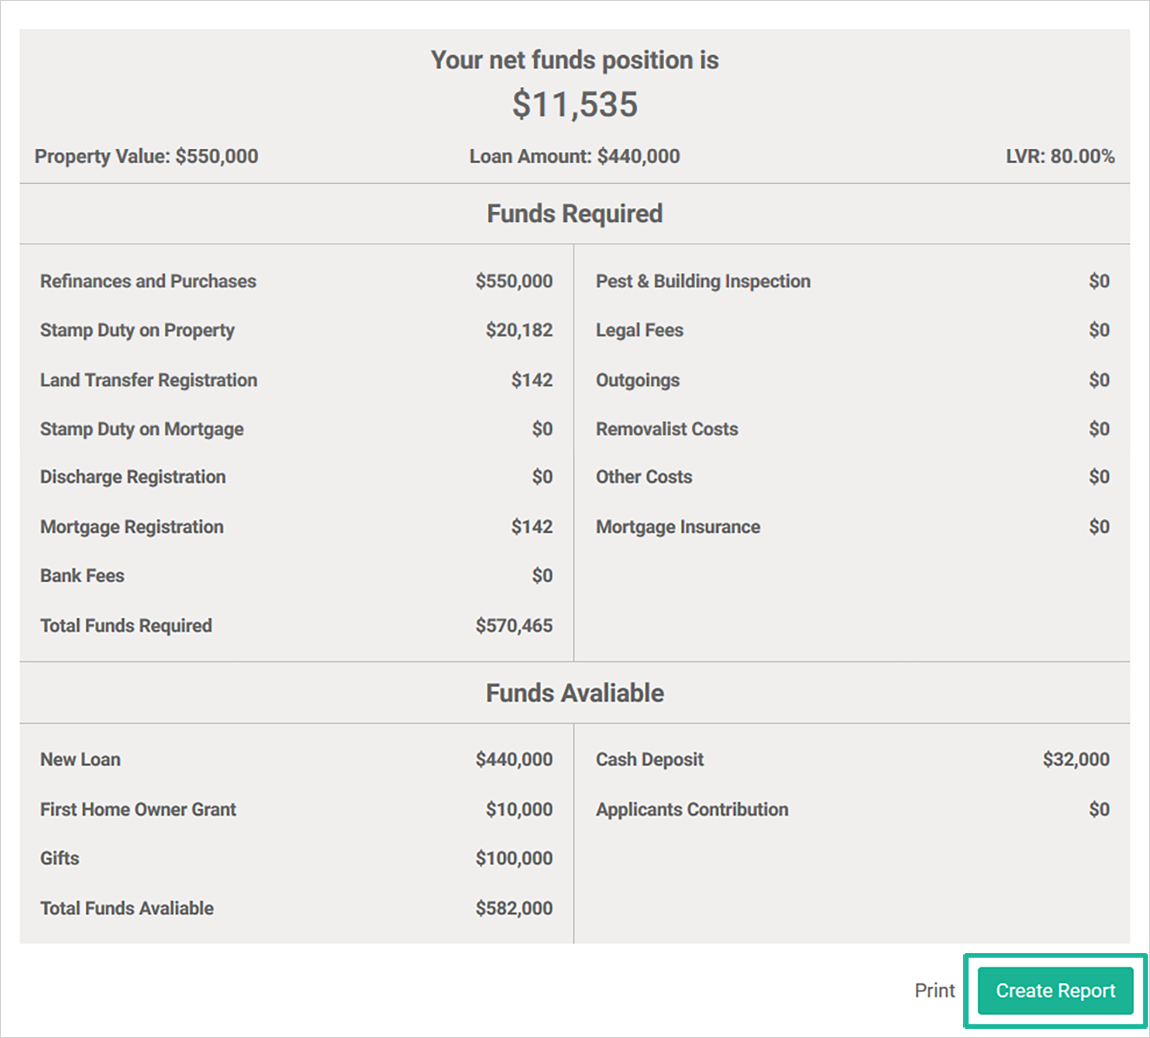
Infynity calculates the clients net funds position using the information you
have entered as well as the LVR. When you are confident the information is correct,
the next step is
to
'Create Report' as shown:
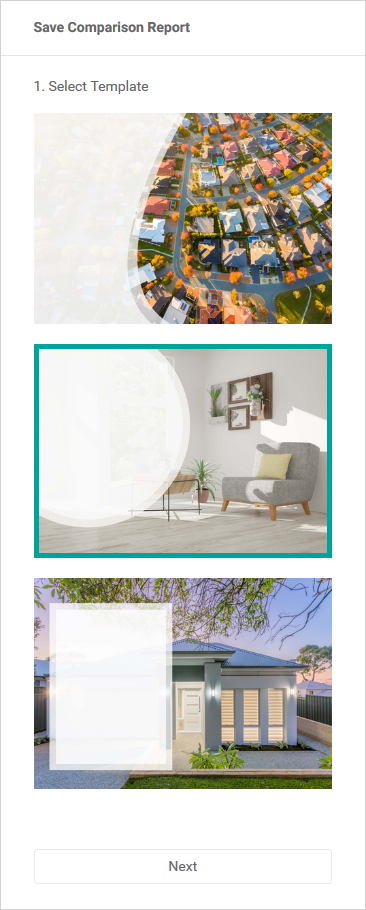
Initially you will have three stylish templates to select from for the background of your Client Funding Report, as shown:
Press next as you are given more options under the 'Add Notes' feature
- Notes Heading
- Body of your message, customisable with ten different fonts and formatting options such as
bold and italic and
highlight
When you are finished with your enhancements, press the Print option, this will then allow you to:
- View
- Download
- Share

Attachments
If the Loan facility is NCCP exempt, slide the toggle bar to reflect this.
All documents are to be uploaded at the same time that the application is submitted to the Lender for
assessment into the following two categories:
- Application Documents
- Compliance Documents
When you have a library of documents available for the client, you will be able to use the search field as shown:

Related Parties
Add or edit any parties that are associated with your client, your options
are:
- Lender solicitor
- Real estate agent
- Solicitor (for your client)
- Builder
- Other
- Accountant
- Financial Planner
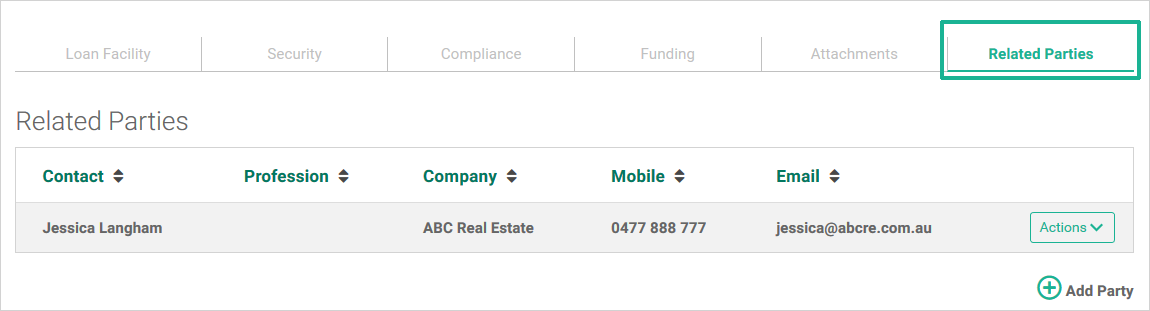
You have now completed the Loan and Products tab. Press 'Return to Loan Summary' as shown to get to the next section (Notes):
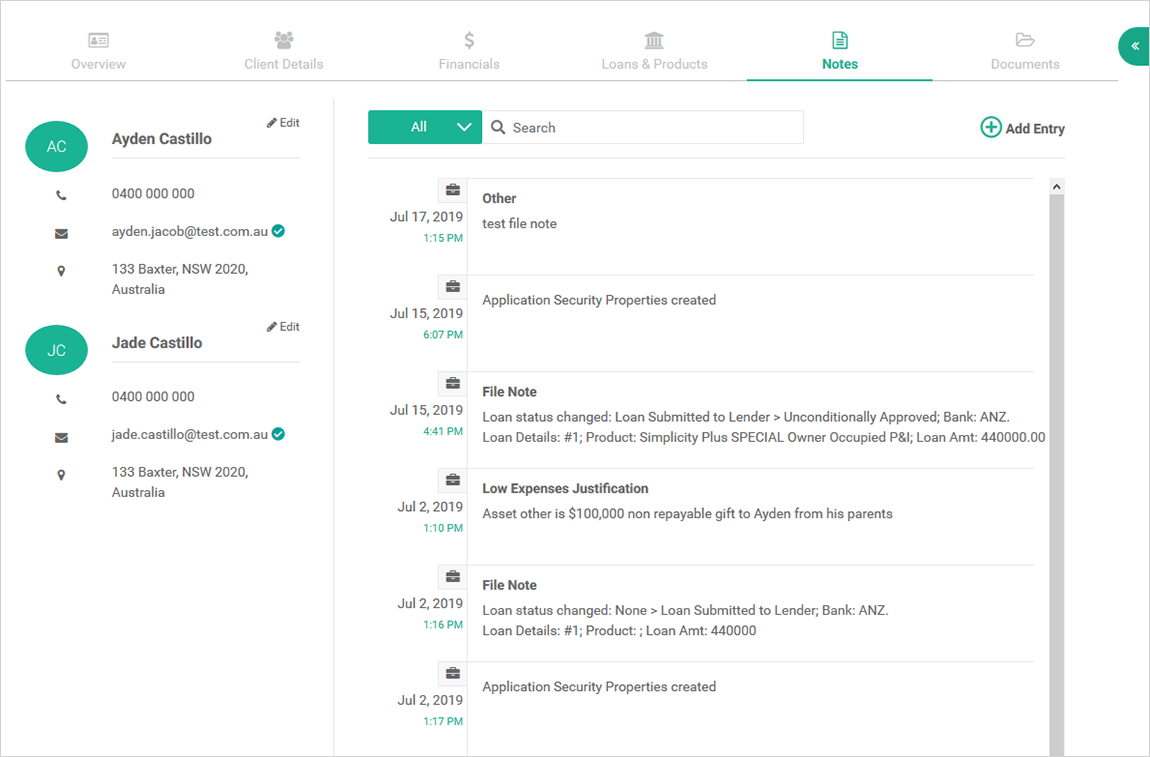
Notes
Your Notes view will show the clients' profile that you are leaving the File Note in.
There is no limit to
the amount of file notes that you can have, we suggest more instead of less.
Notes typically are summaries of your interaction with the client, phone calls, emails, SMS etc. They are
your first line of defence if a complaint is made against you from the client. The more comprehensive your
notes, the more protected you will be. Examples of notes are:
- Date of initial meeting / interview with client and what was discussed
- Needs analysis completed
- Servicing calculated and the result
- Product comparison discussion and the outcome (why was the specific lender and loan selected)
- Supporting documentation provided from the client
- Compliance documentation issued to the client
- Etc as the application progresses through the pipeline .....
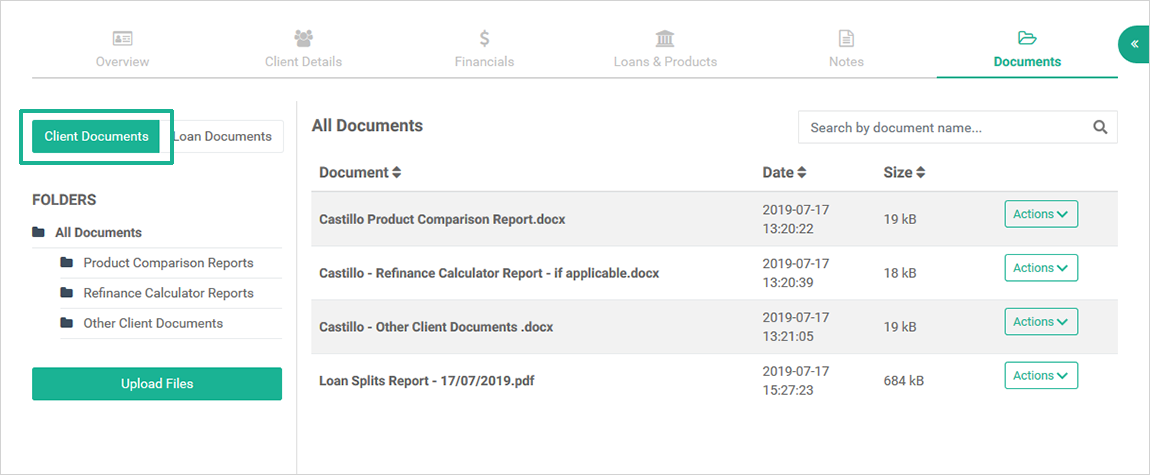
Client Documents
Infynity enables you to save all account related documents to your client’s profile. The first option is 'Client Documents' as shown:

Click on the relevant tab from these options:
- Product Comparison Reports
- Refinance Calculator Reports if applicable
- Other Client Documents
- and then click 'Upload Files'
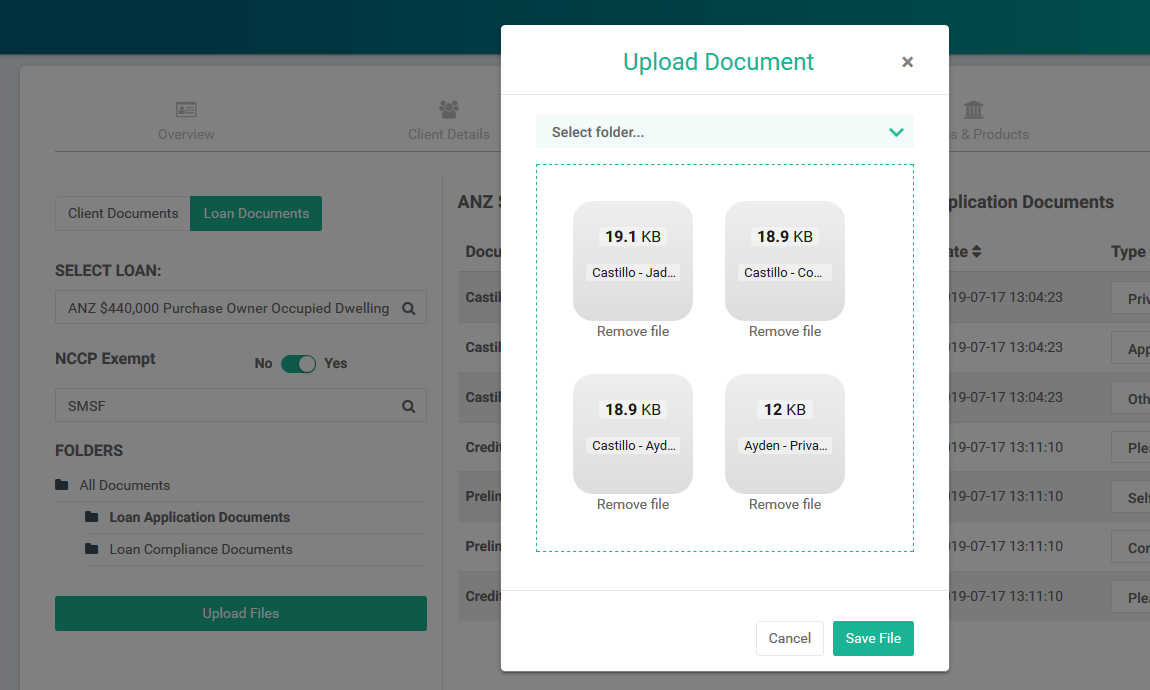
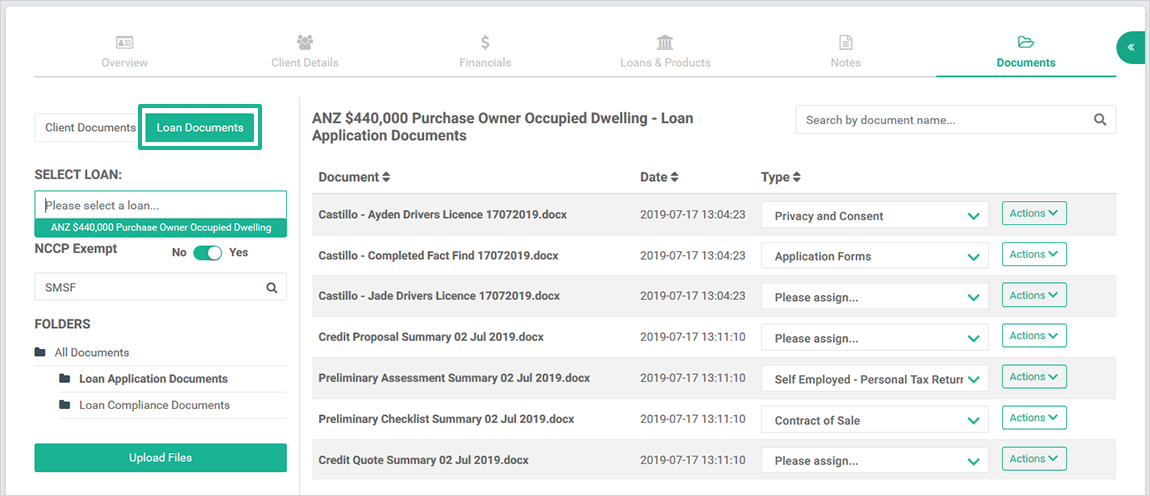
The Loan Documents option gives you the option of Loan Application Documents and Loan Compliance Documents as shown:
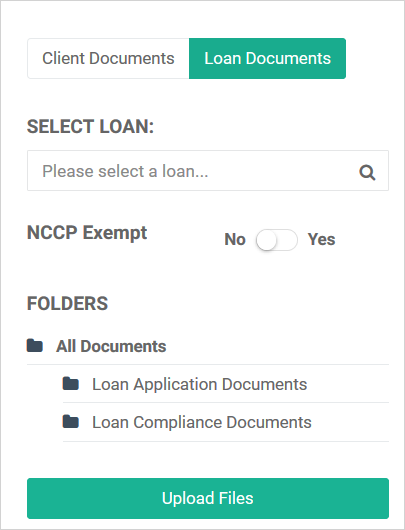
Loan Documents, Loan Application Documents option as shown:
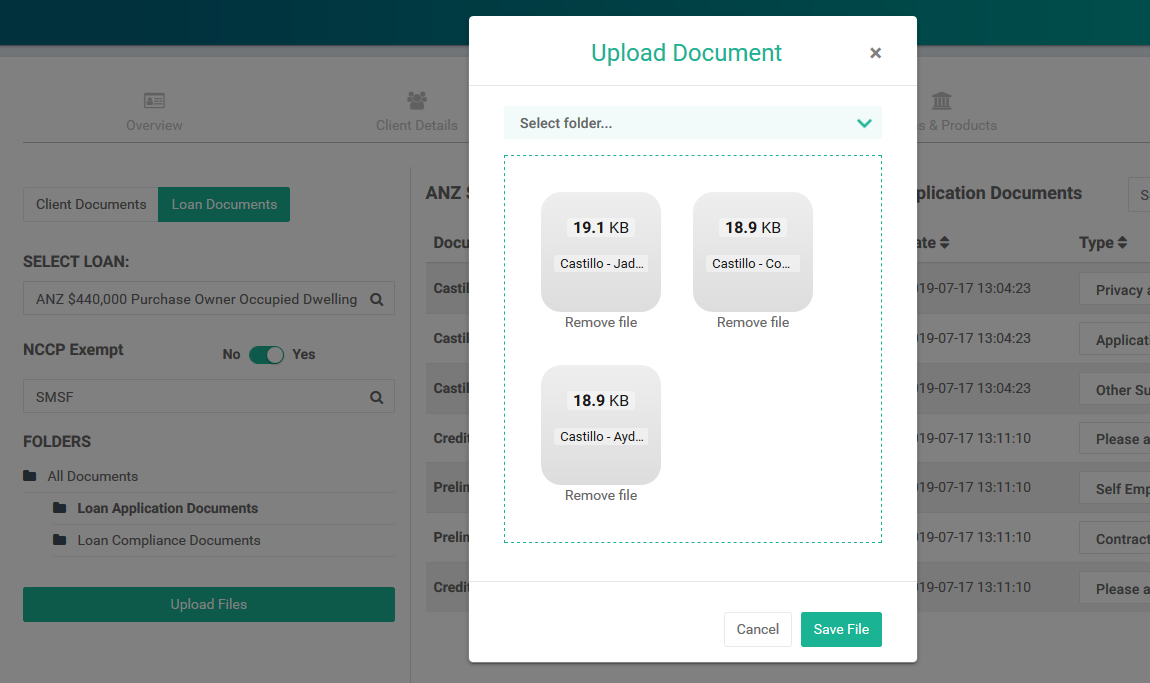
Loan Documents, Loan Application Documents option as shown:
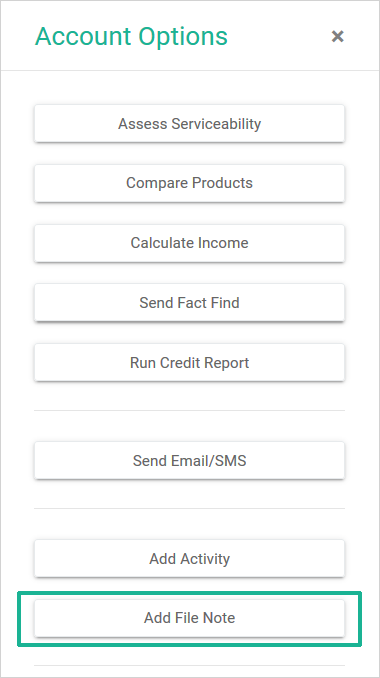
Account Options
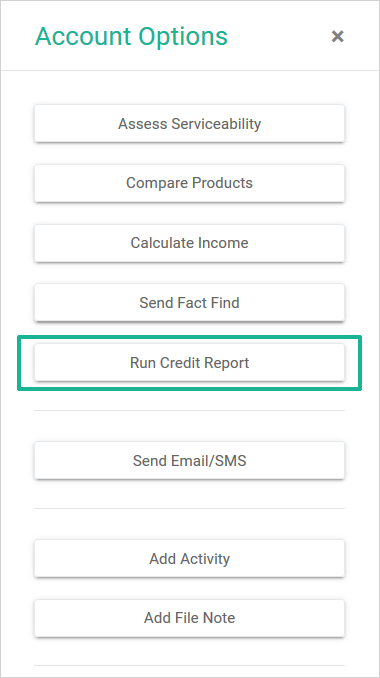
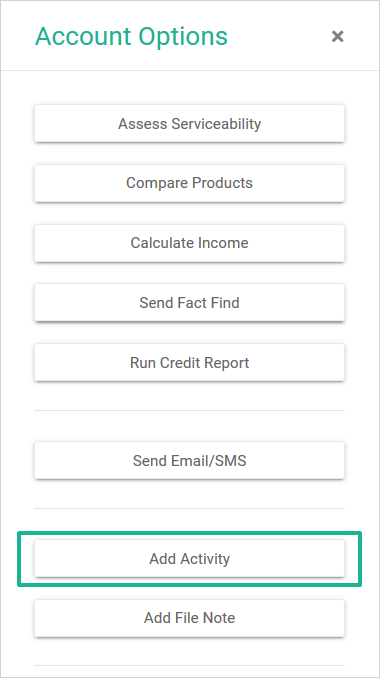
Within the Managed Accounts view is Account Options, to access this selection click on the green tab as shown here:

This section will allow you to access the following Account Options while still remaining within the
client’s profile:
- Assess Serviceability
- Compare Products
- Calculate Income
- Run Credit Report
- Send Email/SMS
- Add Activity
- Add File Note
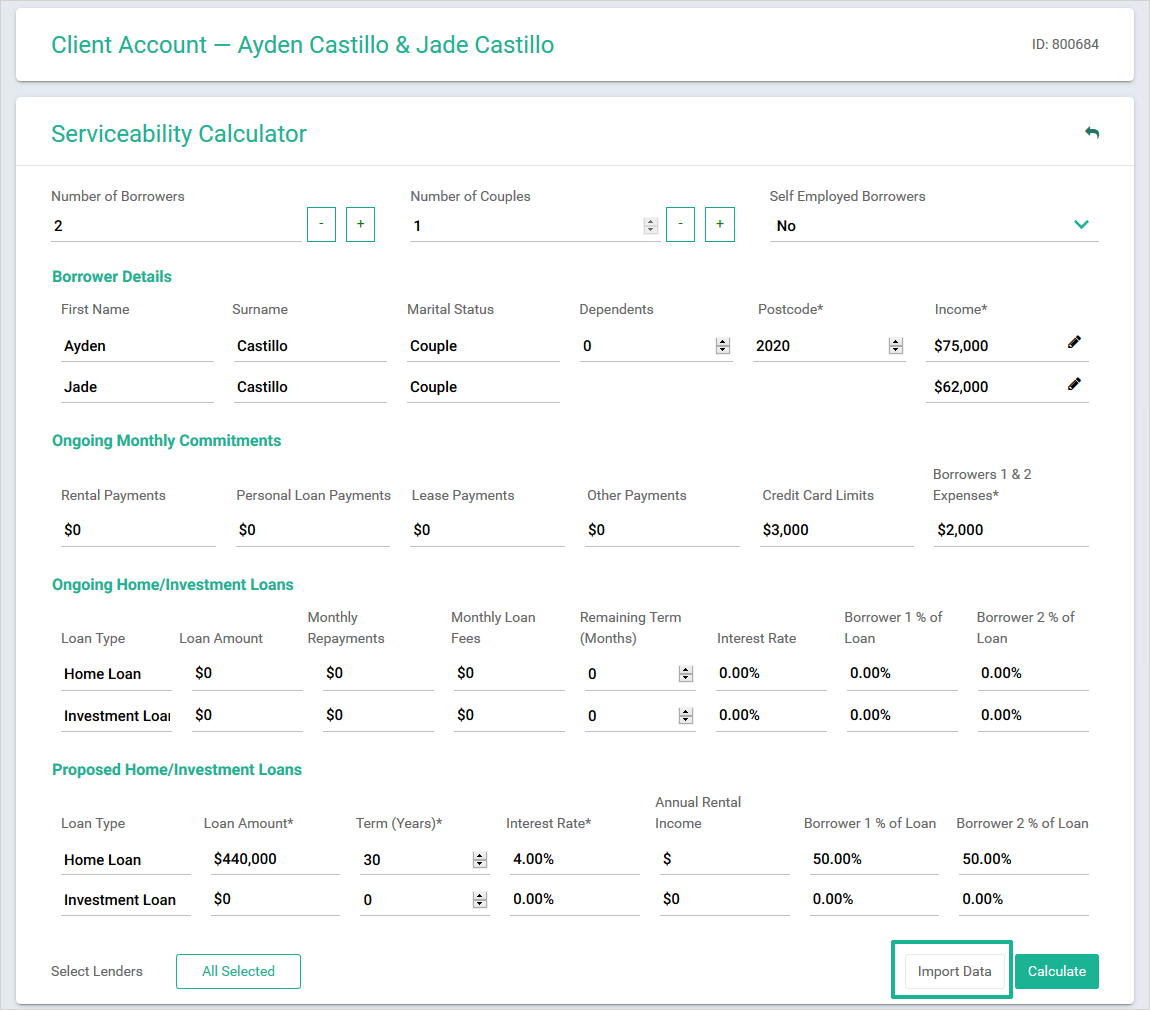
Assess Serviceability
This function is also known as your 'Quick Qualifier'. Select the 'Import Data' option and then confirm the information that has prepopulated from your previous input into the related fields. Serviceability is determined by Infynity knowing key information such as how many applicants there are, if there are any dependants as well as Income, Commitments (expenses), Ongoing Loans and Proposed Loans as shown:
Quick Qualifier functions as a stand-alone calculator, the Quick Qualifier gives an accurate estimate of
your client’s maximum borrowing capacity with each lender. The results displayed are based on the
individual lenders two very important factors:
- Servicing / Assessment rates
- Benchmarked Living Expenses
When you have completed the required input of client information, click on 'Calculate' and your results will be displayed as shown:
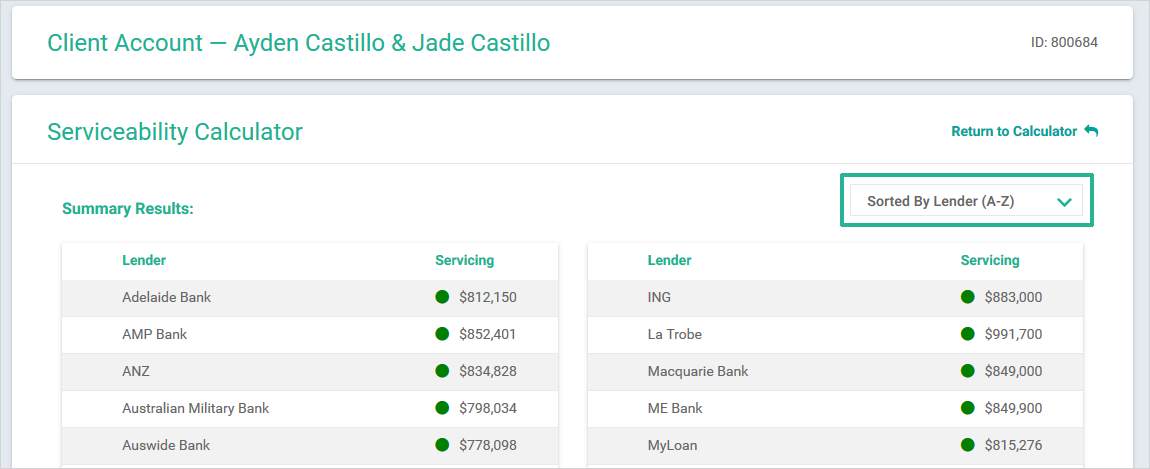
The results will be sorted by Lender A-Z however the following options are
available to you:
- Sorted by Lender (Z-A)
- Sorted by Servicing (Max to Low)
- Sorted by Servicing (Low to Max)
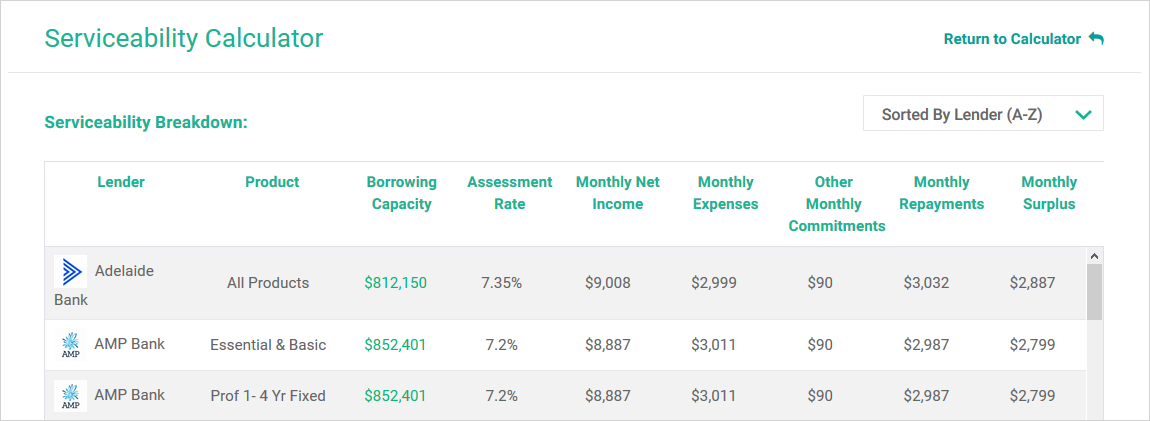
At the bottom of the screen you also have the option to click 'View Details' this will give you an enhanced and detailed view of the Assessment Rate and Benchmarked Living Expenses as shown below:

At the bottom of the screen you also have the option to click 'Compare Products'
Compare Products
Infynity gives you the functionality to compare all available Lenders on
panel by interest rates and products. There are two views:
- Compare Home Loans
- Compare Loan Splits

Compare Home Loans - Loan Overview
Validate the prepopulated information such as Loan Amount and Property Value.
Complete the following fields:
- Loan Term
- Use Type:
- Owner Occupied
- Investment
- Credit Status:
- Clear
- Minor Blemish [AAA]
- Minor+ Blemish [AA]
- Serious Blemish [A]
- Major Blemish [BBB]
- Rate Type:
- Any
- All Fixed
- Variable
- Basic
- Intro
- Fixed Rate Option in Years: 1; 2; 3; 4; 5; 6+
Loan Options
Narrow down the available results by selecting the appropriate options for your client’s
finance Objectives and Requirements
- Loan Repayments
- Loan Purpose
- Loan Requirements
When you have completed the appropriate options, click 'Find Products' to run the analysis and obtain the results which look like this example:
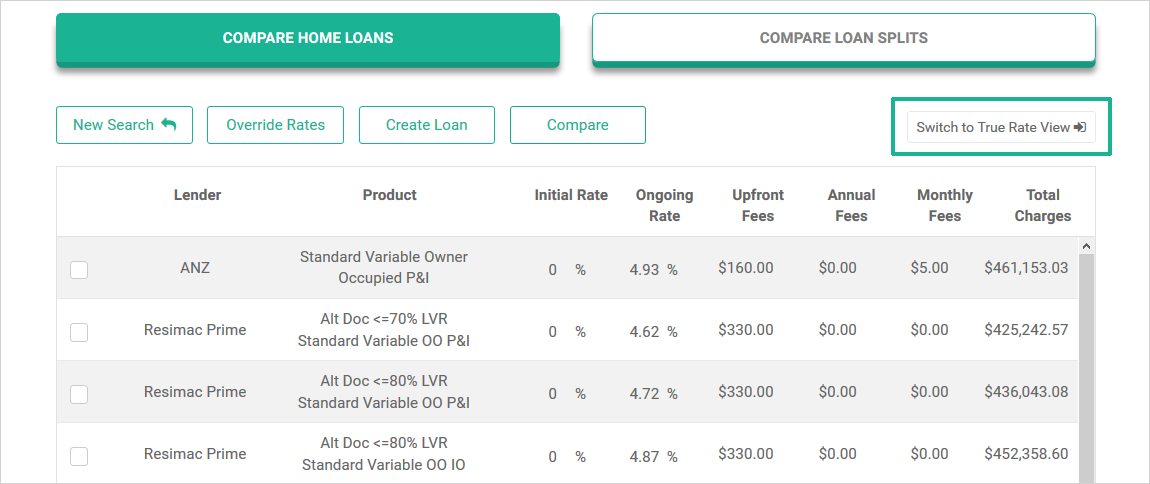
You have the option to select the view to change:
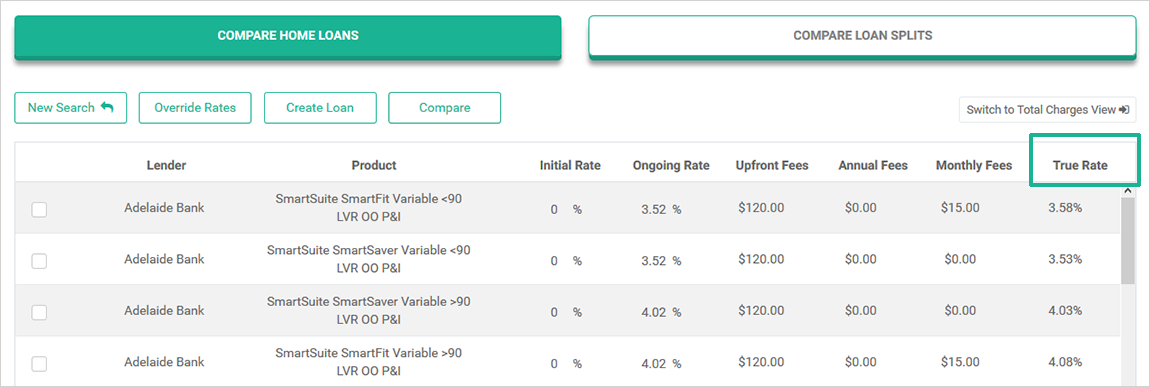
- from 'Total Charges View' to
- 'True Rate View'
It will reflect as shown below. Click on 'True Rate' as highlighted below to sort the rate from low to high and high to low.
Sub Tab options available are:
- New Search
- Override Rates
- Create Loan
- Compare
New Search:
Clears the current data and results, takes you back to the Loan Overview section
Override Rates:
When you click on 'Override Rates' the Initial Rate and the Ongoing Rate fields are activated – this means you can
enter the discounted loan interest rate that has been approved by a specific lender
Create Loan: select the loan the client has chosen and allocate it to the client profile – this is
a short cut and
an excellent way to ensure you have selected the correct loan product with the lender
Compare: select up to six different lender loan options to compare the interest rates and features
Product Fact Sheet: for every Lender and every Loan there is a Product Fact Sheet available, click
on the magnifying
glass icon on the right-hand side of the product name to access this information:

Compare Loan Splits - Loan Overview
This new feature enables you to have multiple splits under the one facility amount (most commonly used for clients that require both variable and fixed rate loans). Specify the number of splits and the screen will adjust to accommodate this as shown:

Make your selections from the options available to show the options available to your client.

When you are ready, click 'Create Report' as shown above. The following options will then
become available as shown below:
- Existing Account; use the search functionality to locate your client
- Create Report
- Save Results

Note: the last ten Split Comparison Reports are stored at the bottom of the page in HTML
and
PDF.
Only products that can be split will be included in the results displayed. For example: CBA’s No Fee Home Loan or
Basic 3 Year Rate Saver products cannot be split, therefore those products will not be included in the results
displayed in Split Comparison.
When you Create Report you are enabled the same stylish template options as previously used in your Client Funding
Report:
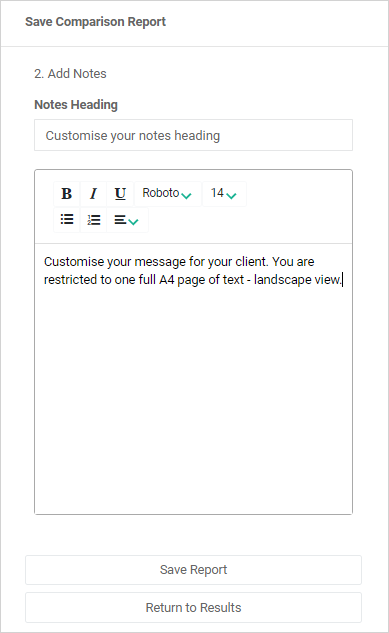
When you save the report, you have the option to customise the Notes Heading and Content boxes to make the report more specific to your client as shown:
Calculate Income
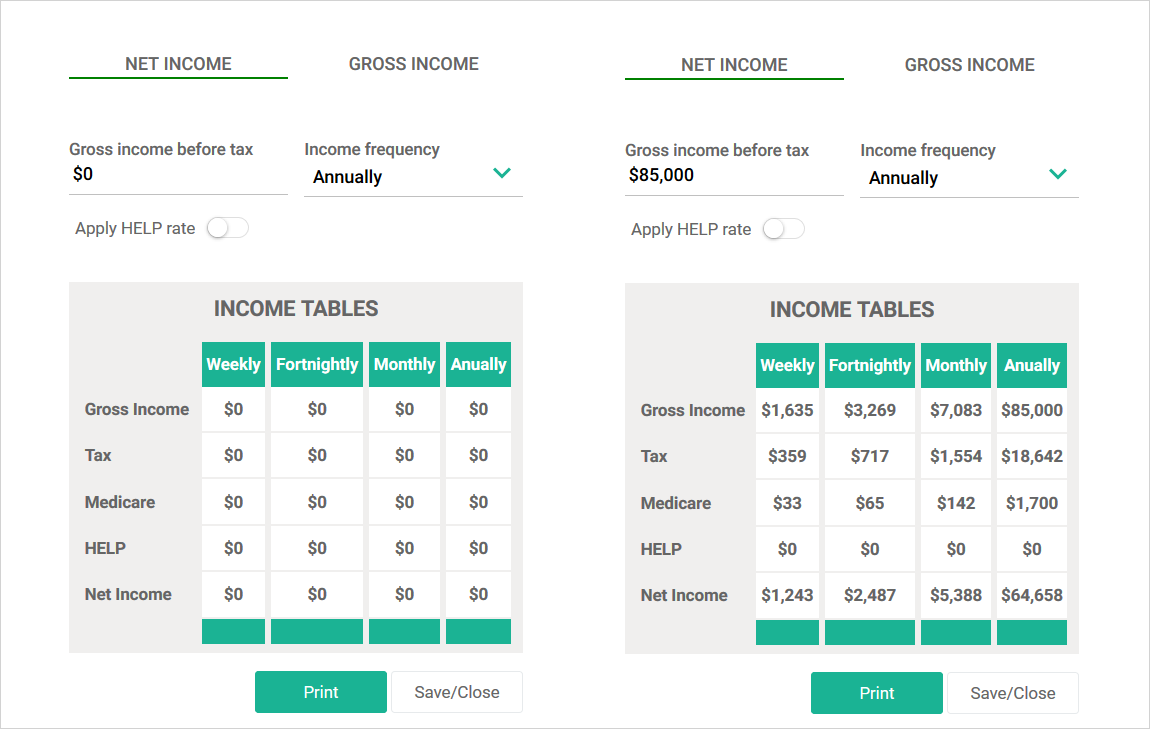
Within the Account Options section, there is an inbuilt Income Calculator. Enter the
gross income amount before tax and the frequency, your frequency options are:
- Weekly
- Monthly
- Annually
- YTD
If HELP (previously known as HECS) applies to the client, slide the toggle bar to green to activate and update the calculation. Press 'Save/Close' as shown below:
Run Credit Report
The ability to obtain your Client’s Credit Report is an optional service that
Infynity provides
for Brokers. Beagle Finance holds the Equifax 'VEDA' Credit Reporting membership. The Clients
Credit Report will have recorded on it that Beagle Finance has ‘viewed’ the Clients Credit
Report. However, it is not recorded as a ‘finance application’ which means the Credit Score is not
impacted.
Brokers must have the Finsure Client Consent form signed by their Client/s and attached, prior
to entering Credit Card details and proceeding to ordering of the Clients Credit Report. This is
mandatory.
Important: Do not upload a blank document to proceed and fast track to obtaining the Clients
Credit Report as the Consent Form you have uploaded into Infynity cannot be deleted or amended
once it has been uploaded for audit and compliance integrity.
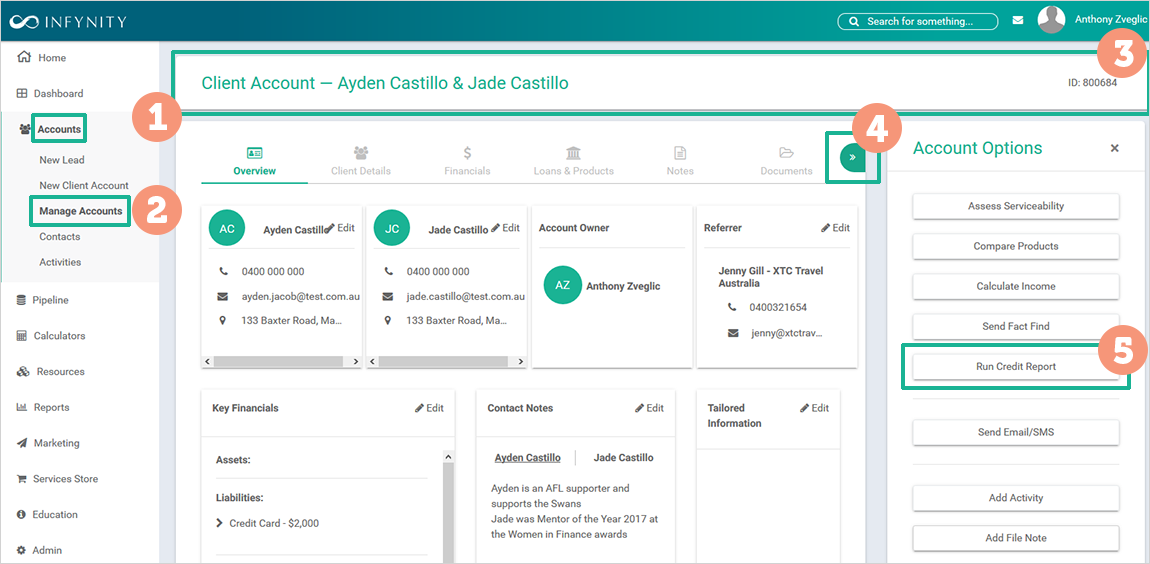
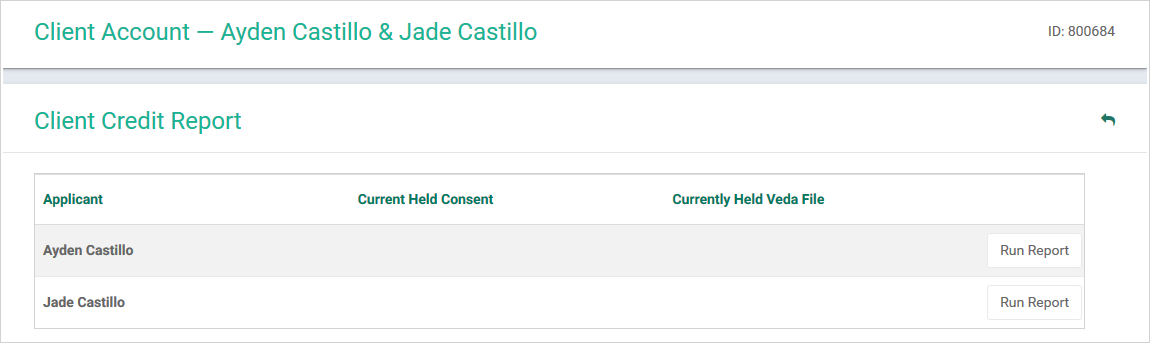
To order credit reports access your Clients profile through the Accounts – Manage Accounts area.
Use the SIDE bar functionality from within you Client profile. Click the 'Run Credit Report'
option on the page as shown below and search for, locate and select the appropriate Client:
When you click the 'Run Credit Report', you will need to confirm which Client you are running the report for as shown:
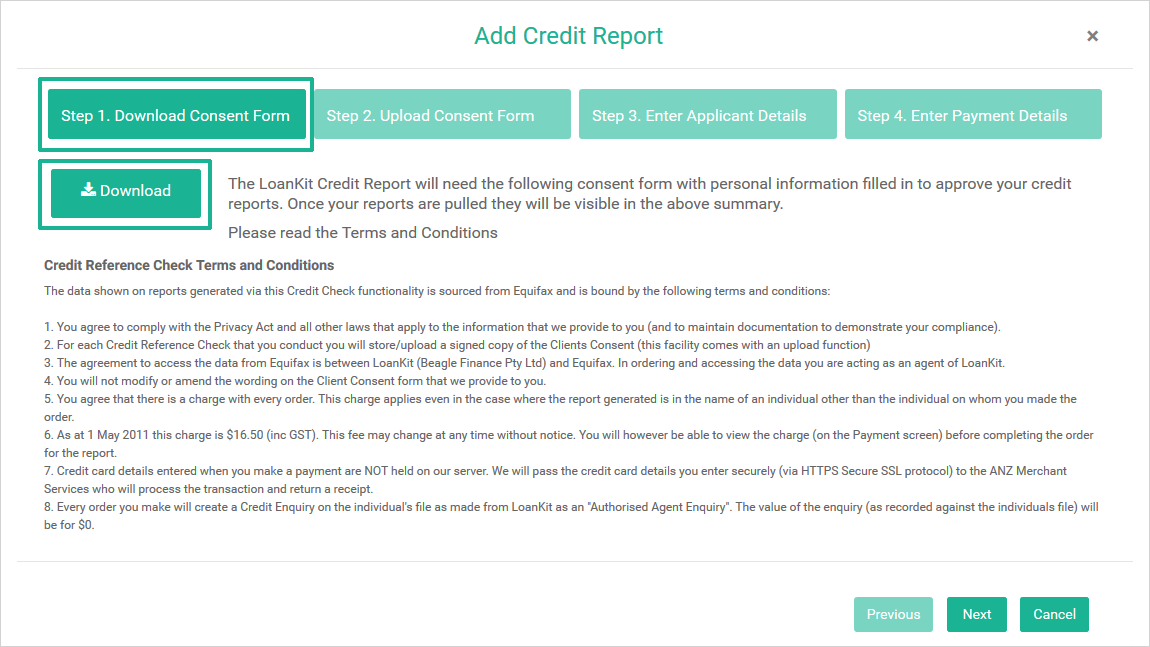
When you select the Client, you will see the following four steps that must be completed in the
correct order:
- Step 1. Download Consent Form
- Step 2. Upload Consent Form
- Step 3. Enter Applicant Details
- Step 4. Enter Payment Details
Step 1: Click the 'Download Consent Form' to download the consent form. Complete the form with the Clients personal information to authorise access to the Credit Report click the step 2 button.
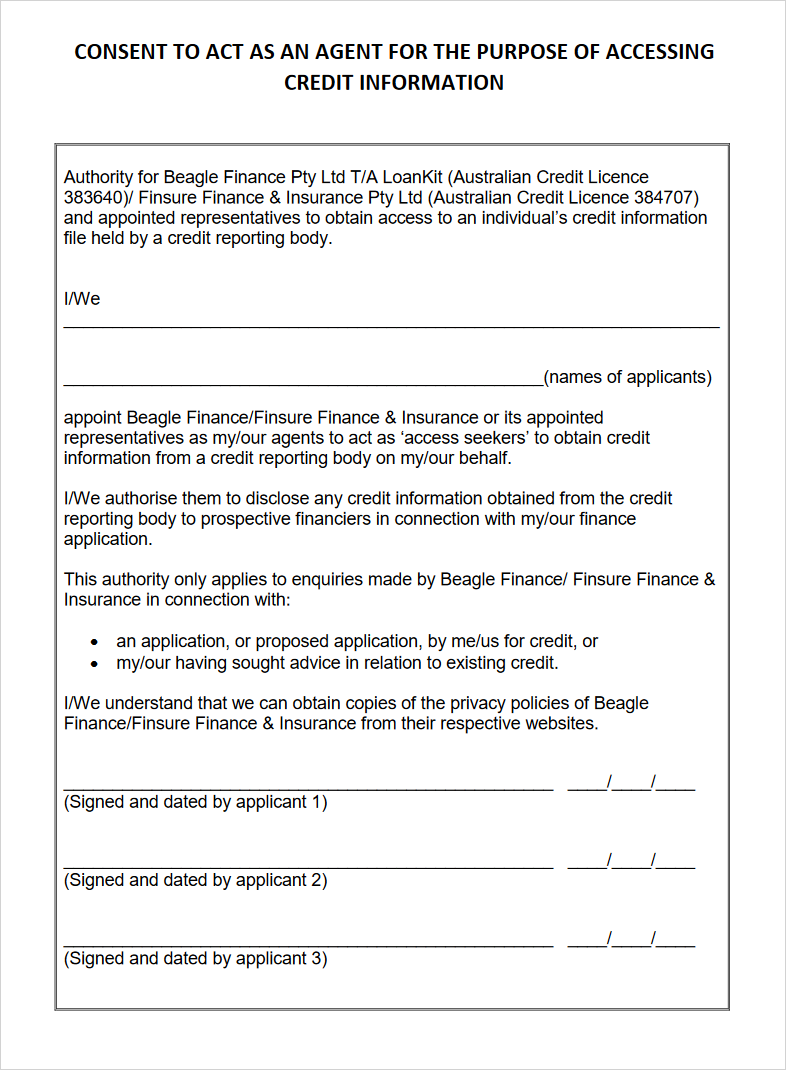
The Client Consent Form must have the Clients full legal name/s of the applicants and must be signed and dated by the applicant, the form must not be edited and looks like this:
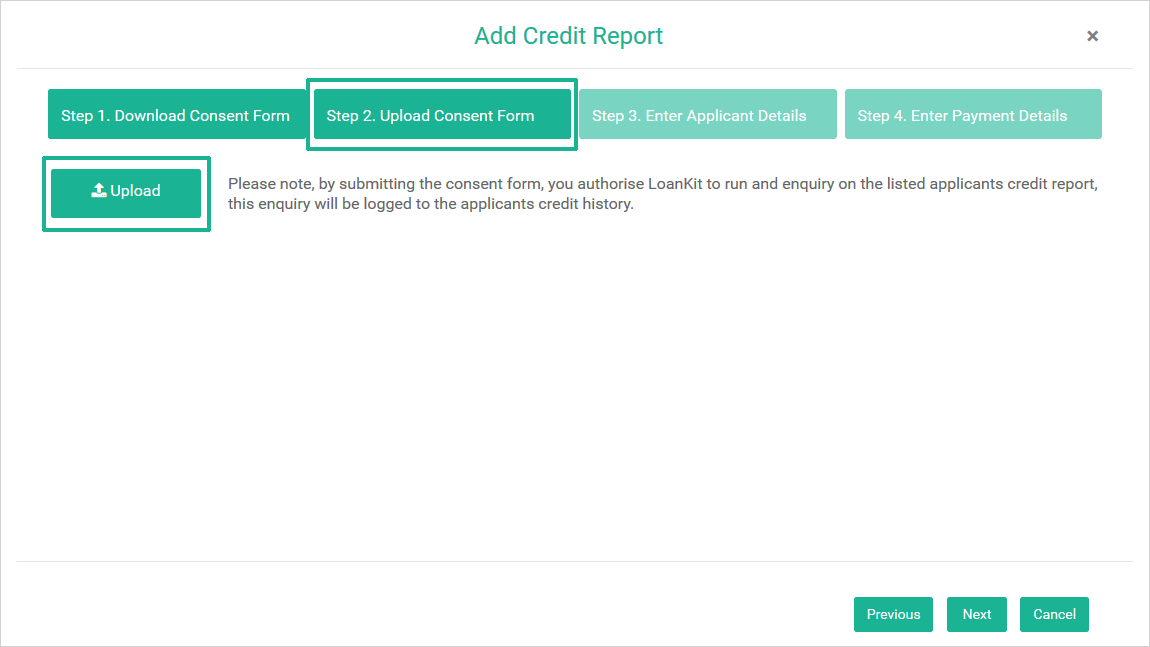
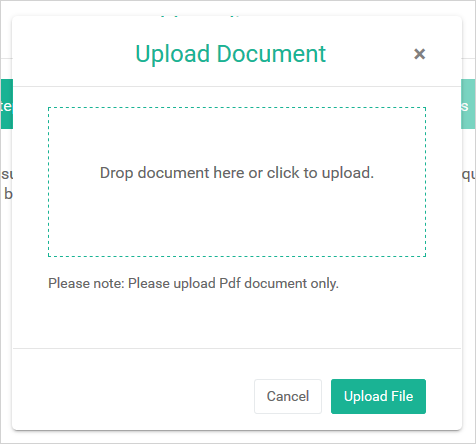
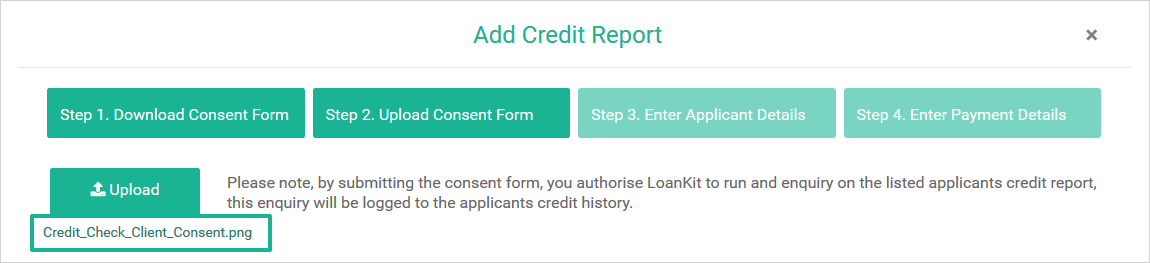
Step 2: Click the 'Upload Consent Form' to upload the fully completed and Client signed consent form. Locate the signed document in PDF format on your device and then press the 'Upload File' button as shown:
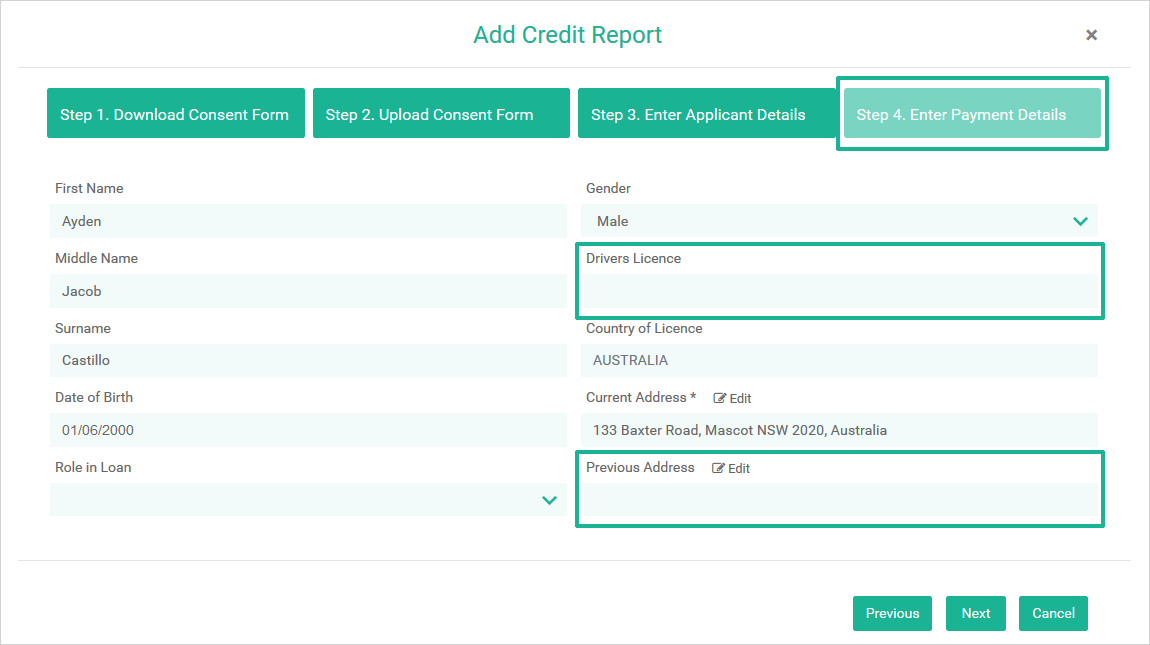
Step 3: The Client’s details will be pre-populated with the information you have already entered into your database on the Client. Complete any missing information that is required 'for example as shown below drivers licence details and previous address information would be required to accurately run a Credit Report'. Click the 'Next' button to proceed to Step 4 'Payment'
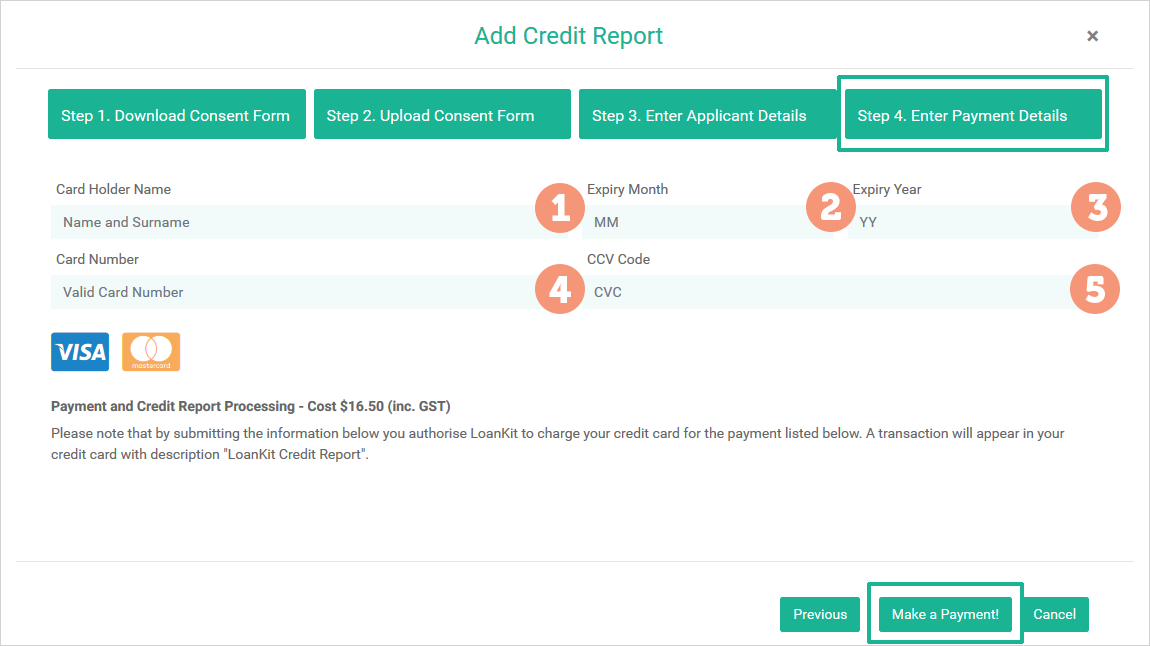
Step 4: enter the information to make payment for the Clients Credit Report.
Note: if the Client is paying for the report, get their written 'email' consent as evidence. Do
not store their credit card details, do not obtain their credit card details via email etc.
Always remember to abide by the Privacy Act regulations.
Required information is:
- Visacard or Mastercard are the payment options available
- Card Holder Name
- Expiry Month of Visacard or Mastercard
- Expiry Year
- Card Number
- CCV Code: Card Verification Value on the back of the Visacard or Mastercard.
Credit Reference Check Terms and Conditions
The data shown on reports generated via this Credit Check functionality is sourced from Equifax
and is bound by the following terms and conditions:
- You agree to comply with the Privacy Act and all other laws that apply to the information that we provide to you (and to maintain documentation to demonstrate your compliance).
- For each Credit Reference Check that you conduct you will store/upload a signed copy of the Clients Consent (this facility comes with an upload function)
- The agreement to access the data from Equifax is between LoanKit (Beagle Finance Pty Ltd) and Equifax. In ordering and accessing the data you are acting as an agent of LoanKit.
- You will not modify or amend the wording on the Client Consent form that we provide to you.
- You agree that there is a charge with every order. This charge applies even in the case where the report generated is in the name of an individual other than the individual on whom you made the order.
- As at 1 May 2011 this charge is $16.50 (inc GST). This fee may change at any time without notice. You will however be able to view the charge (on the Payment screen) before completing the order for the report.
- Credit card details entered when you make a payment are NOT held on our server. We will pass the credit card details you enter securely (via HTTPS Secure SSL protocol) to the ANZ Merchant Services who will process the transaction and return a receipt.
- Every order you make will create a Credit Enquiry on the individual's file as made from LoanKit as an 'Authorised Agent Enquiry'. The value of the enquiry (as recorded against the individuals file) will be for $0.
Send Client Form
Use the Send Client Form feature to send the Electronic Client Form [Fact Find] to your
client for them to complete themselves electronically. Your client will be able to open an online form [Fact Find]
and complete their details in the Fact Find electronically.
This feature has been designed for new clients to your database.
Step 1: Set up the new client’s profile into Infynity, you will need the new client’s basic
information:
- Full name
- Mobile phone number
- Email address
Note: The mobile number the client provides will be their log in ID into the Electronic Client Form [Fact Find].
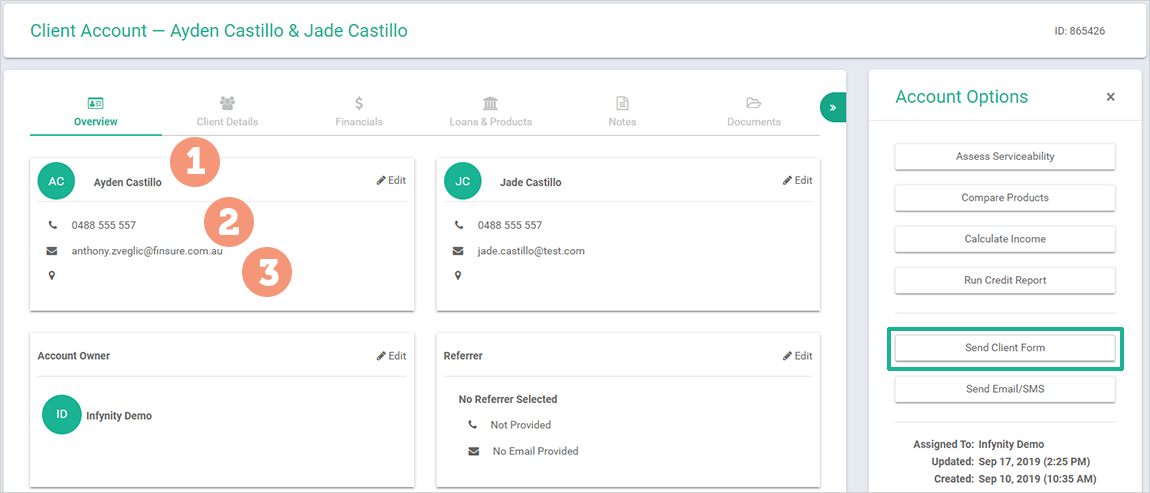
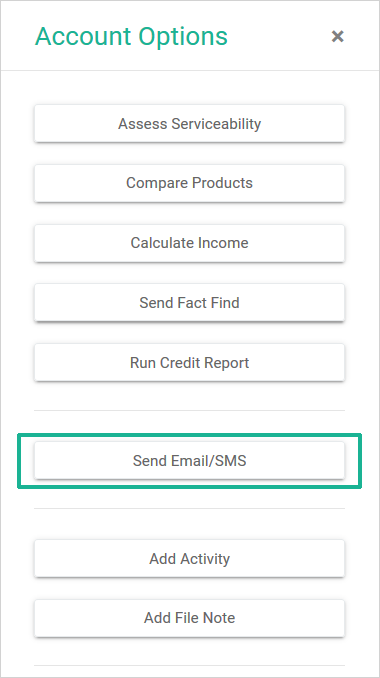
Step 2: Click “Send Client Form” in the Account Options menu as show in the above image.
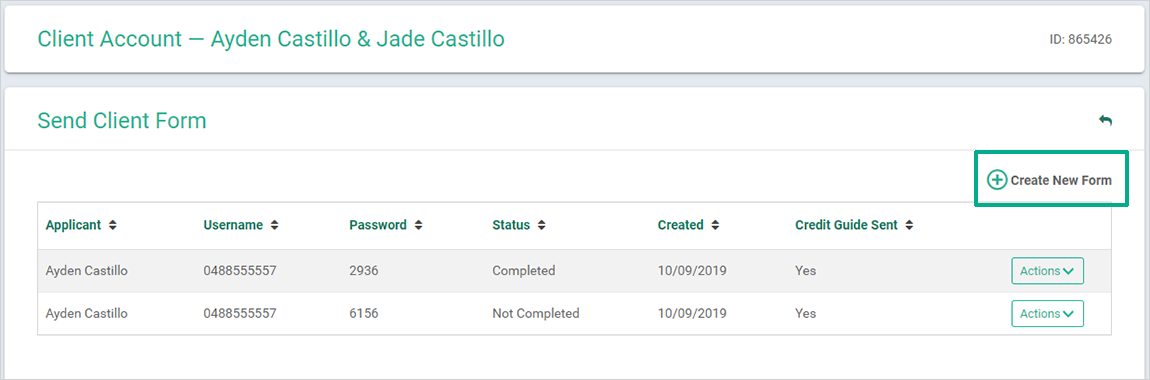
Step 3: Click “Create New Form” as shown below and complete the fields:
- Send To: Select the client / applicant that will be completing the form (one applicant to complete if joint application)
- Select Applicant/s: Confirm all parties to the loan application here
- Add Credit Guide: Recommended as best practice
- Client Message: Personalise the body of the message that will be included in the email that is sent to the applicant
Note: Infynity automatically inserts the applicant’s salutation in to the email as well as your name as the sender of the email.


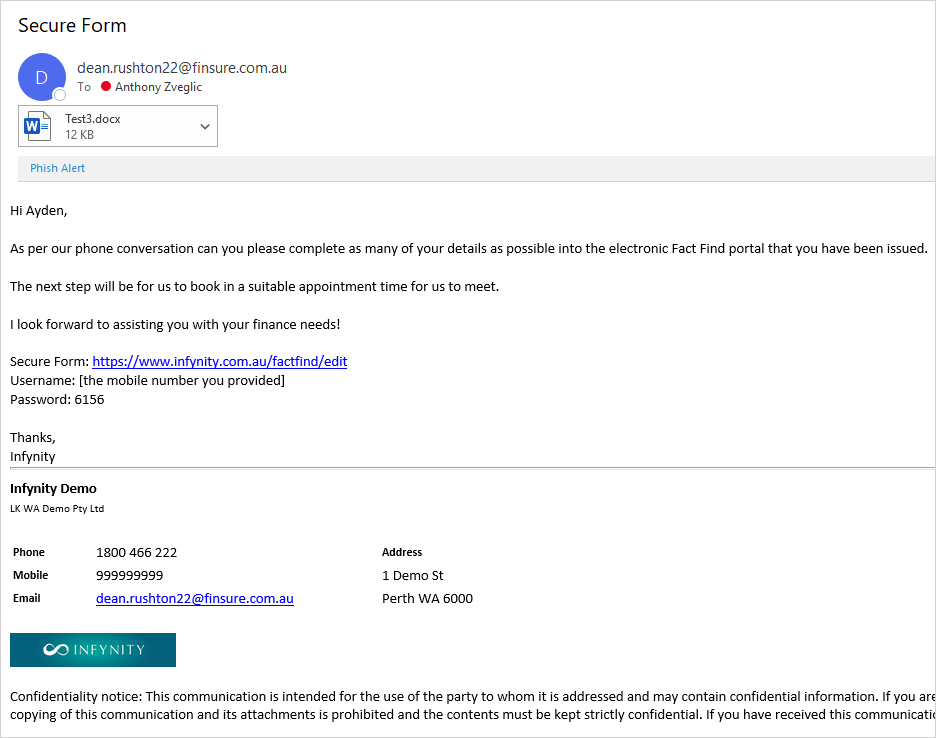
Step 4: Click “Send Form” the applicant will be sent an email from you with the following
details:

Step 5: Applicant logs into in Infynity platform and completes their “Client Details & Financials”
sections as shown below:


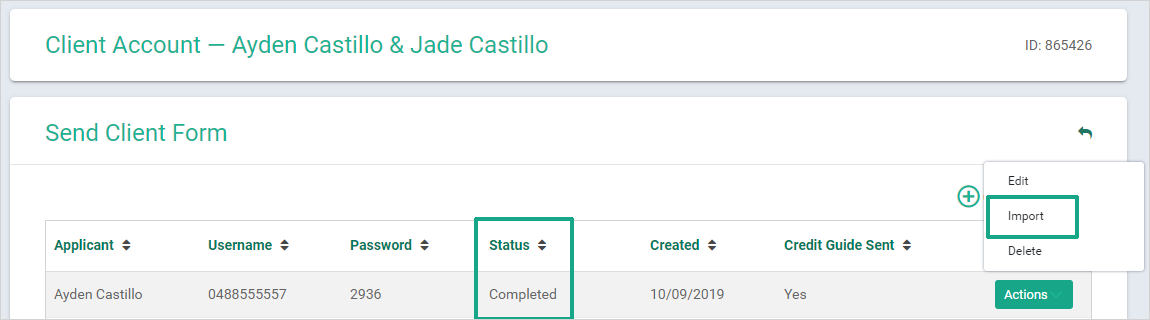
Step 6: After the Applicant completes their input, an email will be sent either to the broker or to
the Admin staff member that has sent the form to the client, notifying that the form has been submitted. The status
will also change. The Broker is then ready to “Edit” or select the “Import” option as shown:
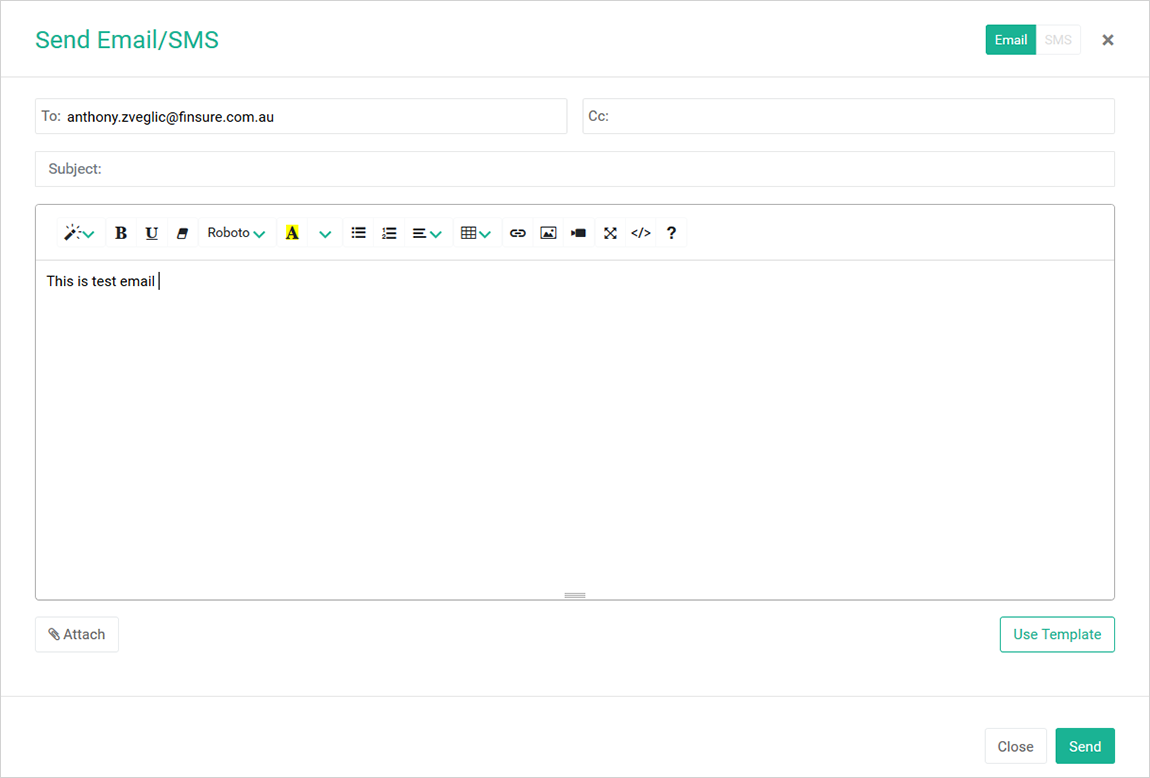
Send Email / SMS
This feature enables you to email or SMS (there is a cost to utilise the SMS feature)
your clients and 'Use Templates' as the basis of your communication. The email and SMS templates available are:
- CONFIRMING APPOINTMENT WITH A CLIENT
- TO REFERRER – APPOINTMENT BOOKED
- FOLLOWING APPOINTMENT WITH CLIENT
- TO REFERRER - AFTER APPOINTMENT BOOKED
- SENDING APPLICATION and ASKING FOR SUPPORTING DOCS
- TO REFERRER – APPLICATION SENT TO CLIENT
- LODGEMENT
- TO REFFERER – LOAN LODGED
- Client Next steps: Loan application process
- CONDITIONAL APPROVAL
- Client Congratulations - Conditional approval granted
- TO REFERRER – CONDITIONAL APPROVAL
- TO REFERRER – CLIENT PURCHASED
- FORMAL APPROVAL
- TO REFERRER – FORMAL APPROVAL
- Client Formal Finance Approved
- PURCHASE SETTLEMENT BOOKED
- REFINANCE SETTLEMENT BOOKED
- TWO DAYS BEFORE SETTLEMENT
- TO REFERRER – LOAN SETTLED
- DAY AFTER SETTLEMENT
- Client Loan Settlement Information
- WEEK AFTER SETTLEMENT
- TO REFERRER – PAYMENT DAY
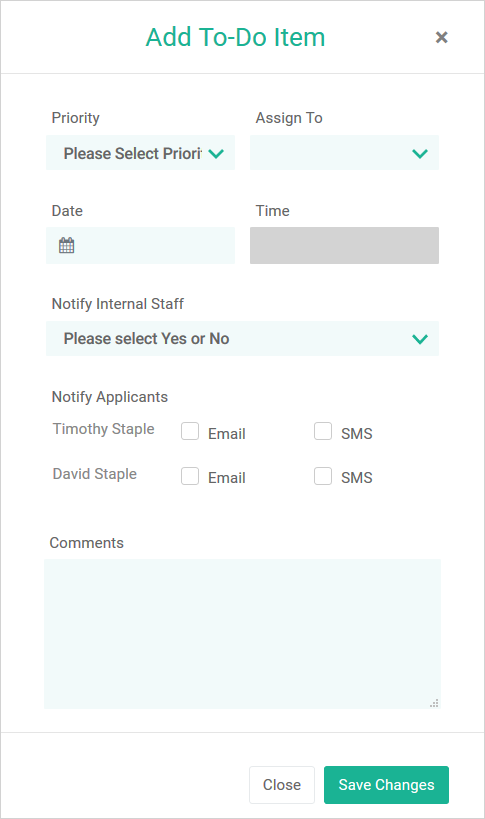
Add Activity
Use the Add Activity / To-Do Item feature to stay on top of your outstanding tasks.
Remind yourself to contact the client a month after their loan has settled to confirm that their automated loan
repayment has been processed, this gives you another touch point and reason to ask for a referral. Creating the
To-Do Item is very straightforward:
- Select Priority: High / Medium / Low
- Assign To: yourself as the Broker
- The Date and Time
- Notify your Internal Staff option
- Notify Applicants
- Comments section
- Save changes
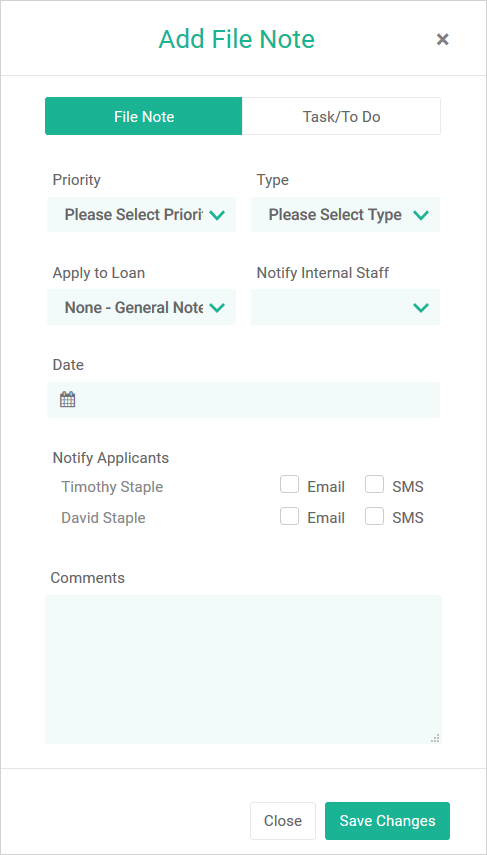
Add File Note
Use the Add File Note feature to record important pieces of information about the client.
There is no limit to the amount of file notes that you can have, we suggest more instead of less.
Notes typically are summaries of your interaction with the client, phone calls, emails, SMS etc. They are your first
line of defence if a complaint is made against you from the client. The more comprehensive your notes, the more
protected you will be. Examples of notes are:
- Date of initial meeting / interview with client and what was discussed
- Needs analysis completed
- Servicing calculated and the result
- Product comparison discussion and the outcome (why was the specific lender and loan selected)
- Supporting documentation provided from the client
- Compliance documentation issued to the client
- Etc as the application progresses through the pipeline .....
Using the Add File Note feature is very straightforward:
- Select Priority: High / Medium / Low
- Type of Note: select from the drop down menu:
- Other
- Applicant Communication
- Lender Communication
- Internal Communication
- NCCP Breach Report
- Progress Payments
- Referral
- Security Details
- Solicitor
- Personal Details
- Notify Internal Staff: If applicable
- Date of Note
- Notify Applicants option via Email or SMS
- Comments section
- Save changes
Note: to access your clients File Notes, access their Infynity profile and click on their Notes section as shown:
