Client Centre FAQs
General
Q1: What is the Client Centre?
The Client Centre has been created by Finsure within the Infynity platform as a data capturing and communications portal to engage with your customers.
Q2: Is there a video tutorial I can watch that shows me how to use the centre?
Yes.
You can access this by selecting “Click here” on the blue bar at the top of the Client Centre dashboard:

Q3: What branding will my clients see on emails sent from Infynity and within the Client Centre?
If you have added a customised email signature in Infynity > Admin > Settings, this will automatically add to the body of your emails when providing Client Centre access / sending a questionnaire.
If you have arranged for Finsure Marketing/Admin to upload your business logo to Infynity – this will appear within the Client Centre.
Q4: Can I still use the existing Client Form instead of the Client Centre?
No, the Client Centre replaces the Client Form.
Any Client Forms that were sent out prior to the release of the Client Centre on 10th August 2021 can still be retrieved.
New requests will need to be sent via the Client Centre.
Access
Q5: What is the minimum information that needs to be entered to use the Client Centre for a customer?
The minimum information required on the Client Details tab, for each customer includes:
- First Name
- Last Name
- Mobile number
- Email address
Q6: How do I provide my clients with access to the Client Centre?
- Within the Client Account – click on the “Client Centre” tab on the top far right-hand side:
- On the left of the Client Centre dashboard there is a section titled Client Centre Access. Select which applicant/s you want to provide access to by toggling ON each client and clicking Save.
- A message box will appear to send an email request to each client. You may choose to type a personalised message to your clients, and then click Send.

Q7: How I send the Credit Guide to my clients via the Client Centre?
You will need to toggle OFF access for each applicable client and click Save.
Then you can toggle the access back ON and include the Credit Guide by toggling ON the option to include Credit Guide and clicking Send.
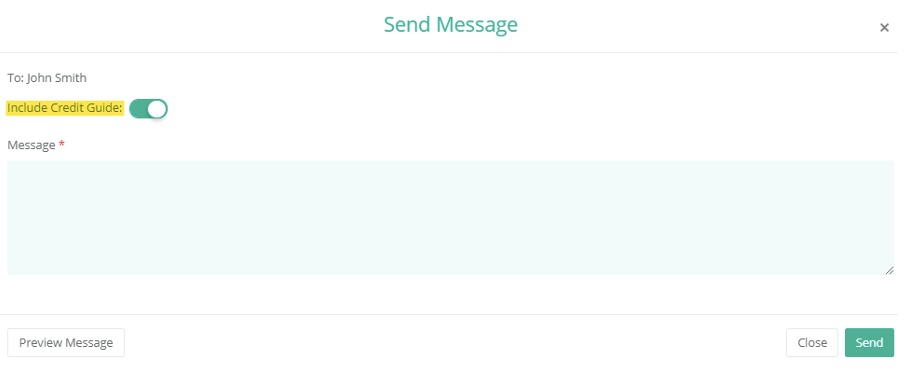
Note: It is encouraged to send the Credit Guide using this method for compliance purposes, as a timestamp will be logged in the Client Notes:

Q8: I forgot to toggle ON to send the Credit Guide with the Client Centre Access email and now I can’t send it again.
We’ve all done it!
You will need to toggle OFF access for each applicable client and click Save.
You can then toggle the access back ON and click Save. When the email message box appears, toggle ON the option to include the Credit Guide and click Send.
Q9: I want my clients to complete the Questionnaire in the Client Centre – how does this work?
Within the Questionnaire section, click on the Send Fact Find button, select the required applicants, and then click Send.
A Fact Find with a reference ID will then populate into the Questionnaire section to show it was sent successfully and to monitor progress.
Each client will receive an email with a link to the Client Centre and a unique 5-digit username and password for access.

Q10: Can I pre-fill information on the client’s behalf?
You may have collected and entered some client details into Infynity already. You can complete as much or as little information as you like.
The clients can amend/update any details you have pre-filled when answering the Client Centre questionnaire.
Q11: I have an existing client, will the information already saved in Infynity be sent to them to confirm and make any amendments?
Yes, there is no need to have your clients re-enter information that you already have saved!
Your clients will be able to review all their saved information and can simply click through the questionnaire and update any applicable fields.
Communication
Q12: I want to send a quick message to my clients – can you please tell me how?
There is a chat box in the bottom left-hand side of the Client Centre dashboard – simply start typing your message in the grey field and click the green send button.

Where there are multiple applicants, first select the required conversation from the Applicants section on the bottom right-hand side of the dashboard.
You can then enter your message (and view any prior conversations) in the Messages section.
Documents
Q13: How do I request specific documents from my clients to send to me via the Client Centre?
From the Documents tab, select the Client Centre Documents folder, then click Request Documents.
Select a Category and an applicant, then click Add.
Once the client has uploaded the relevant document in the Client Centre – the document/s will become available in the relevant section.
Q14: What documents file types can be uploaded and what is the maximum size these can be?
File documents, PDF’s and images are all acceptable.
Max size per file: 50MB
Help
Q15: Has the Infynity User Manual been updated to outline how to use the Client Centre?
It certainly has!
You can access the user manual here.
Q16: I need some more help using the Client Centre, are there any FAQ’s that I can read?
Yes.
There are some frequently asked questions available on the Infynity User Manual, which you can access here.
Q17: My clients need some help using the centre, are there any FAQ’s they can read?
Yes!
There are some frequently asked questions available to your clients within the Client Centre under Help on the left-hand side menu bar – titled “Customer FAQ’s”.
A copy is also attached here for your reference:
Client Centre - Customer FAQ’s
Q18: Something seems to be broken – who can help me or someone from my office?
Our friendly Infynity Support team can assist – you can contact them using the following methods:
- Phone: 1300 346 787 – Option 1
- Email: [email protected] and cc your BDM.
If possible, include a screenshot of the issue and advise the client name/s of the Infynity profile that the issue is occurring on.